#1. Protoss at a Glance
Protoss is the quality faction. Every model is expensive, and good at its job.
- What you have: the best heroes, the most flexible repositioning ( (Stalker), (Adept / Nerazim Watchers), , Pylons, , ( / )), and a defensive toolkit to make your few units last ( (Sentry), Force Fields, (Sentry upgrade), ( faction card), (Immortal)).
- What you don't have: numbers. You'll usually field the fewest models and the fewest activations at the table.
- How you win: make every unit trade up. Land Zealot charges into the unit that matters, snipe Supply breakpoints with Stalkers and Immortals, and use Supply-dense units (Zealots are Supply 2 for 3 models) to win marker counts.
- How you lose: getting out-activated, losing a 280-mineral unit to a bad charge roll, or letting the opponent grind your shields off for free.
#2. Rules That Decide Protoss Games
| Rule | Why it matters for Protoss |
|---|---|
| Shield | Added to the first model's HP (a Zealot's first model has 7 HP). The unit is until Total Damage exceeds the Shield value, or the first model dies. Shielded can't be restored by . Non-Lethal Damage strips it too. |
| Shielded-only abilities | Immortal (enemy weapon damage capped at 1), ( 2) and ( · 1 + 1) all switch off once Shielded is lost. |
| Leading-model leapfrog | Each move action moves only the ; the rest of the squad is set ahead of it. The front of the squad gains roughly 3-4" extra per move action. Details below the table. |
| , (Zeratul), Leaping-style moves, , Artanis . ignores Gap Clearance and elevation. In the Assault Phase, a may end in , so Zeratul's is a charge with no dice. never triggers (that needs a successful Charge). | |
| End-of-Round moves happen after Scoring | (Adept / Nerazim Watchers · Adept shades), deploys and -style effects all resolve in Scoring step 4, after markers are counted. They set up next round; they don't steal this one. |
| VP = Supply destroyed | Your units are Supply-dense. A 2-Stalker squad loses 1 VP per Stalker, and an Immortal is 2 VP in a single model. Deny kills with ( / ) and ( faction card). |
| Surge needs a matching tag | Artanis and Zeratul are Biological, Psionic: immune to Light/Armoured Surge. Stalkers and Immortals are Armoured (they eat Marauder, Tank and Roach-killer surges). Zealots and Adepts are Light (they eat Marine and Zergling surges). |
| One Reaction per player per enemy activation | You own many defensive Reactions (, , (Sentry upgrade), ( faction card), (Zealot upgrade), (), , (Artanis), (Zeratul)). You get one per enemy activation. Pick the right one. |
| Your weapons (Sentry, Zeratul, Stalkers with , ) switch off the enemy's defensive Reactions and the Terran Point Defence Drone. | |
| Every card use exhausts the card; everything refreshes each round | Each Tactical/Faction Card is one PE or one use of its ability per round. Cards refresh in Cleanup, so PE never carries over: unspent PE is lost. Pylons' is your only discount engine. |
Leapfrog, step by step. It applies to every repositioning action: Move, Run, Deploy, Disengage, the 2" Move from (Zealot upgrade / Praetor Guard), (Stalker) and other effects. The coherency distance is 3" (4" for Stalkers, which have ).
- Move the Leading Model along a measured path, up to its full distance.
- Set the rest of the unit anywhere 3" (4" with ) of the leader. They are set, not moved, so they ignore obstacles in between, but each still needs a valid Coherency Link and can't end within 1" of an enemy.
- Set the front models up to 3-4" ahead of the leader.
- Nominate the frontmost model as the Leading Model for the unit's next move action.
- Repeat for every separate move action. The front of the squad gains about 3-4" on top of the move distance each time, so a unit with two or three move actions in a round gains that bonus two or three times.
Example: a Zealot squad that Moves (~7" of front) then takes its move (~5") before charging threatens roughly 20" from where it started the round.
#3. Faction Cards: Which Protoss Are You?
| Daelaam | Khalai | Nerazim | |
|---|---|---|---|
| Slots | 3 Core, 1 Elite, 1 Support, 1 Air | 3 Core, 2 Elite, 1 Hero | 2 Core, 3 Elite, 1 Hero |
| Ability 1 | ( faction card · Reaction): a friendly unit receiving damage reduces Total Damage by 2 (min 1) | ( faction card): place a Pylon anywhere at >10" from enemies (if you don't have one) | ( faction card · Reaction): when a friendly unit loses → Speed (2) and (2) on its first weapon |
| Ability 2 | ( faction card · once per game): every friendly unit within 6" of a point goes back to | ( faction card): at the end of the active unit's activation, immediately activate another friendly unit | ( faction card): active Biological unit gains until End of Round |
| Unlocks | Standard pool | Praetor Guard, Pylon | Nerazim Watchers, card |
| Plays like | Robo/gateway gunline, Immortals + Stalkers | Zealot/Praetor hammer with Artanis and Pylon warp-ins | Stealth, alpha strikes, Zeratul |
- is the most aggressive.
- (Khalai faction card) is a double activation: move two units back-to-back before the opponent can respond, or charge twice in a row in the Assault Phase.
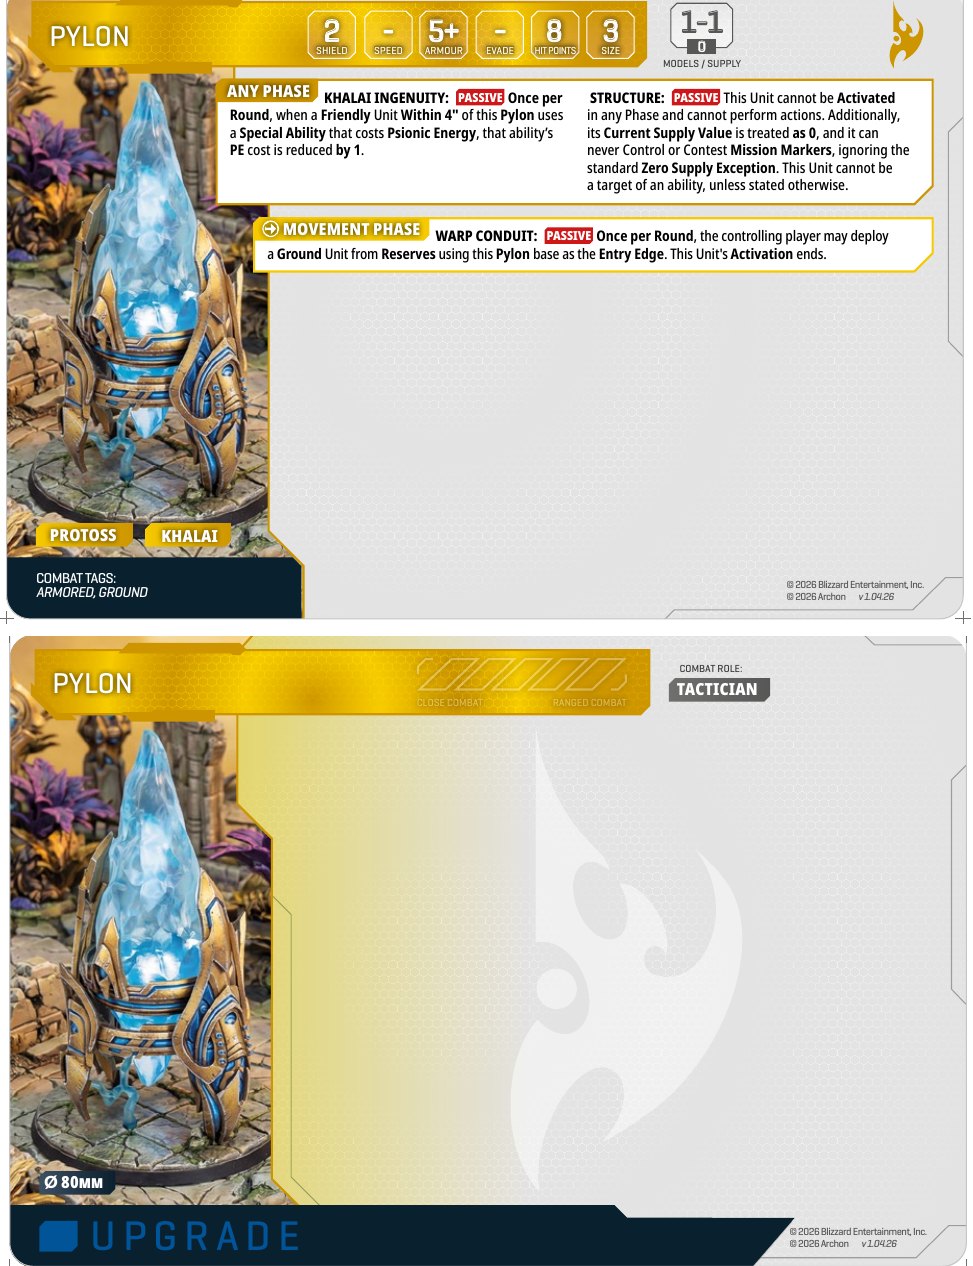
- The Pylon (Supply 0 Structure, Shield 2 + HP 8, Armour 5+, Size 3) is a forward . (Pylon) deploys one ground unit from its base each round, and (Pylon) makes one PE ability per round within 4" cost 1 less.
- The FAQ confirms Pylons are immune to (), and deploying through one ends that unit's activation.
- is the most durable.
- (Daelaam faction card) is a −2 damage reaction usable on any unit type. Huge on a Stalker that's one hit from losing a Supply.
- (Daelaam faction card) is an escape hatch: pull a battered cluster off the table so the opponent can't score it, then redeploy with damage intact.
- No hero slot unless you buy .
- is the most explosive.
- Three Elite slots fit Stalkers and Immortals.
- (Nerazim faction card) and (Stalker upgrade / Nerazim Watchers) make units (untargetable beyond 4", Evade vs everything).
- When those units act and drop , (Nerazim faction card) fires (2) on the first weapon. The faction card exhausts, so that's once per round.
#4. Unit-by-Unit Breakdown
Costs are from the September 2026 Cost Table. Each unit's card (front and upgrade side) is shown in full, so check stats and exact wording there; the notes below are about how to use it. The images live in the cards/ folder next to this guide.
#Core
Zealot — 3 for 160 · Supply 2 at 2-3 models
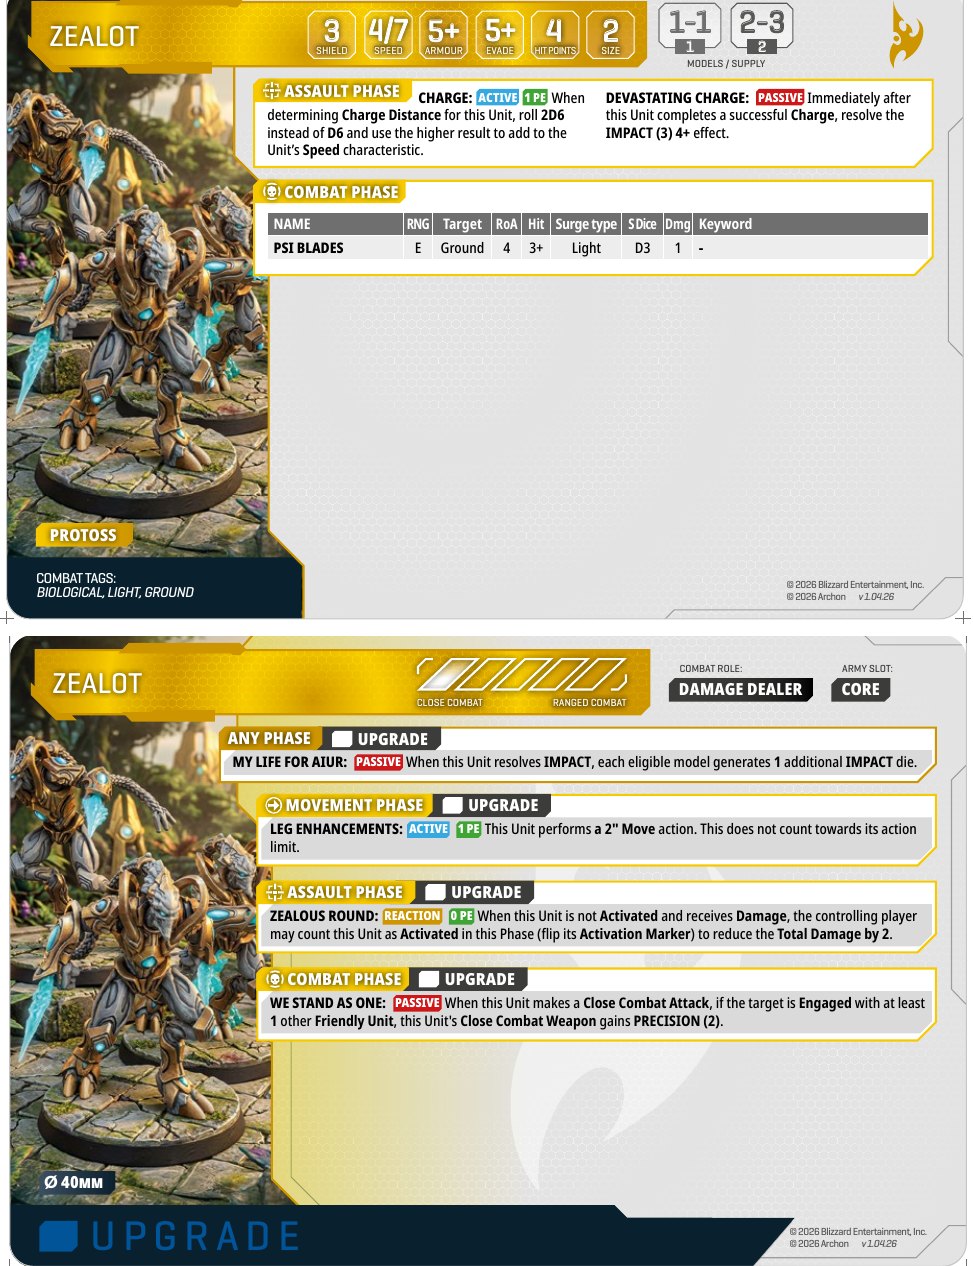
- (Zealot / Praetor Guard · 1 PE): best-of-2D6 on the charge roll. Average reach ~8.5".
- Supply 2 for three models is the best marker-control density in the Protoss book. Killing one Zealot scores nothing; it takes 2 dead to drop to Supply 1.
- (Zealot upgrade · 10): +1 die per model, so 12 dice on a full squad. Always take it.
- (Zealot upgrade · 20, 1 PE; built into Praetor Guard): a free 2" Move action in the Movement Phase. With leapfrog that's ~5" for the front of the squad, on top of the normal Move's ~7". It's what makes a turn-2 charge land: Move (~7") + Legs (~5") + Charge (Speed 4, +2 with (), + best-of-2D6) threatens roughly 20"+ from where the squad started the round.
- (Zealot upgrade · 20): (2) when the target is also with another friendly unit. Great with multi-unit charges.
- (Zealot upgrade · 10, Reaction, 0 PE): if the unit hasn't activated this phase and takes damage, flip it to Activated to reduce Total Damage by 2. Zealots have no gun, so the ideal window is the Assault Phase on a turn they weren't going to charge: it's a free −2. Don't use it in the Combat Phase before they've swung; flipping to Activated there costs you their attack.
- Into Zerglings, three Zealots average ~7 dead a round. Into Marines, ~3.
Adept — 4 for 150
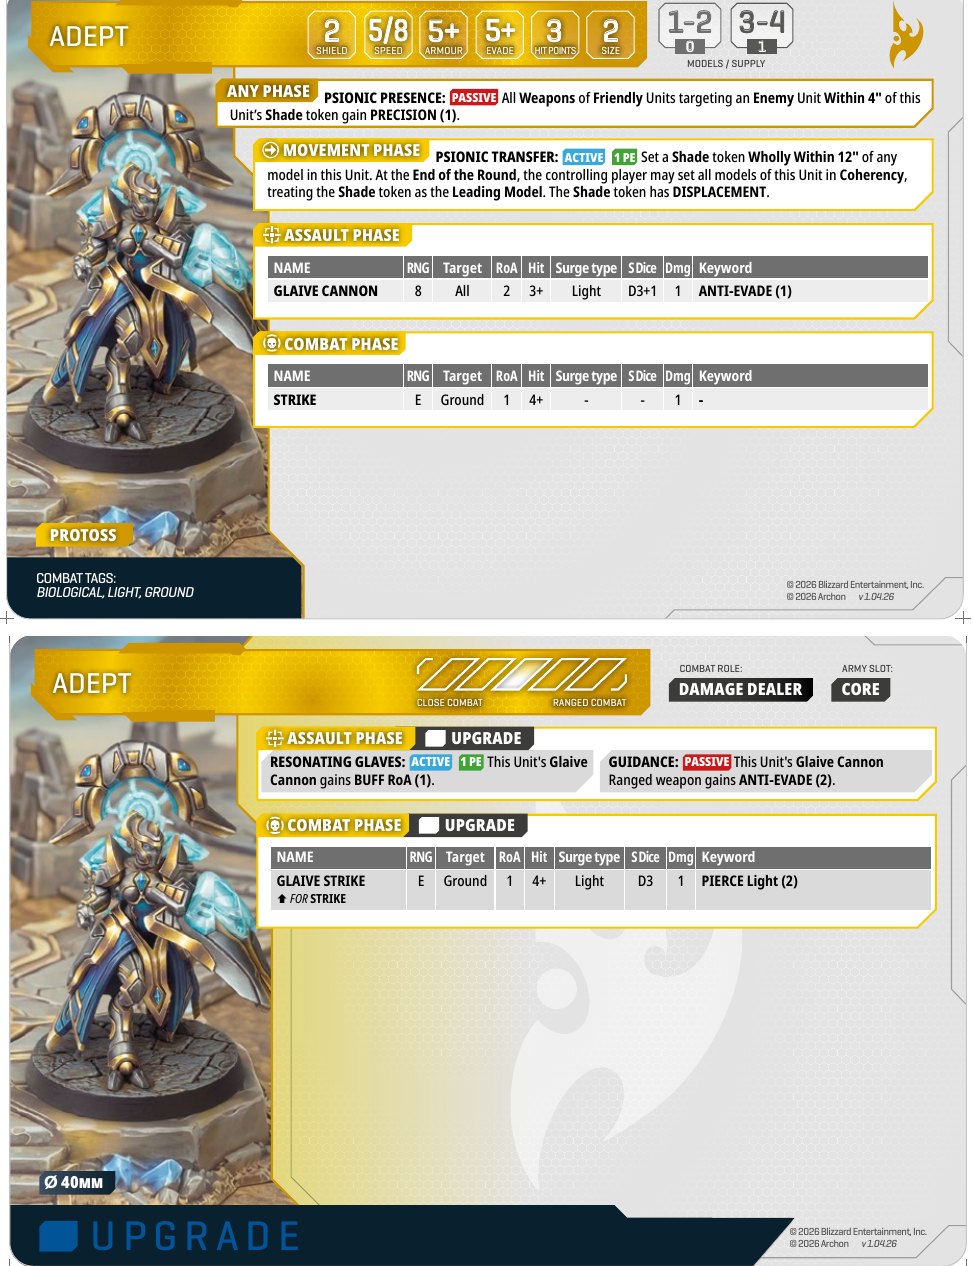
- (Adept / Nerazim Watchers · 1 PE): place a Shade token within 12". At the End of the Round, the whole unit teleports to it, with the Shade treated as the (the Shade has ). The other Adepts are set within 3" of it, so the front of the unit ends up to ~15" away.
- (Adept): every friendly weapon targeting an enemy within 4" of the Shade gains (1). A Shade dropped next to the enemy's key unit buffs your whole army's shooting and charging at it this round. This is Adepts' real job.
- (Adept upgrade · 20, 1 PE): +1 RoA → 12 dice. (20): Light (2) in melee. (Adept upgrade · 10): Anti-Evade (2).
- Cheap, fast, a Supply-0 remnant at 2 models. Great Gather-action bodies.
Nerazim Watchers (Adept) — 4 for 210 · only
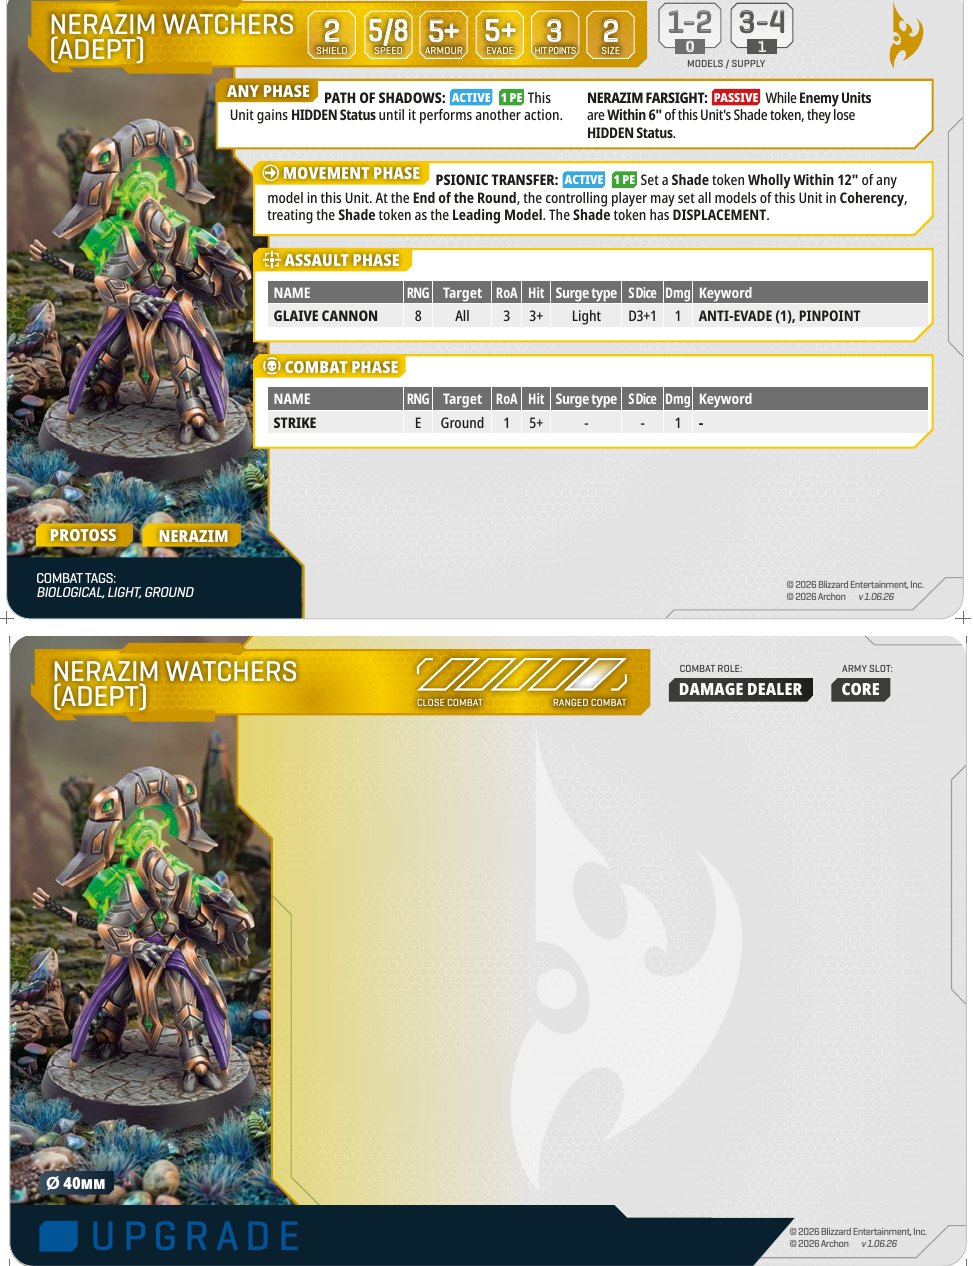
- The Nerazim Adept: the same Shade, plus so they can shoot into combats, and (Nerazim Watchers) to strip around the Shade. is included, along with for RoA 3. and are unavailable, so the remains (1) and Nerazim Watchers have to live with a 5+ Strike profile.
#Support
Sentry — 2 for 130 · Size 1
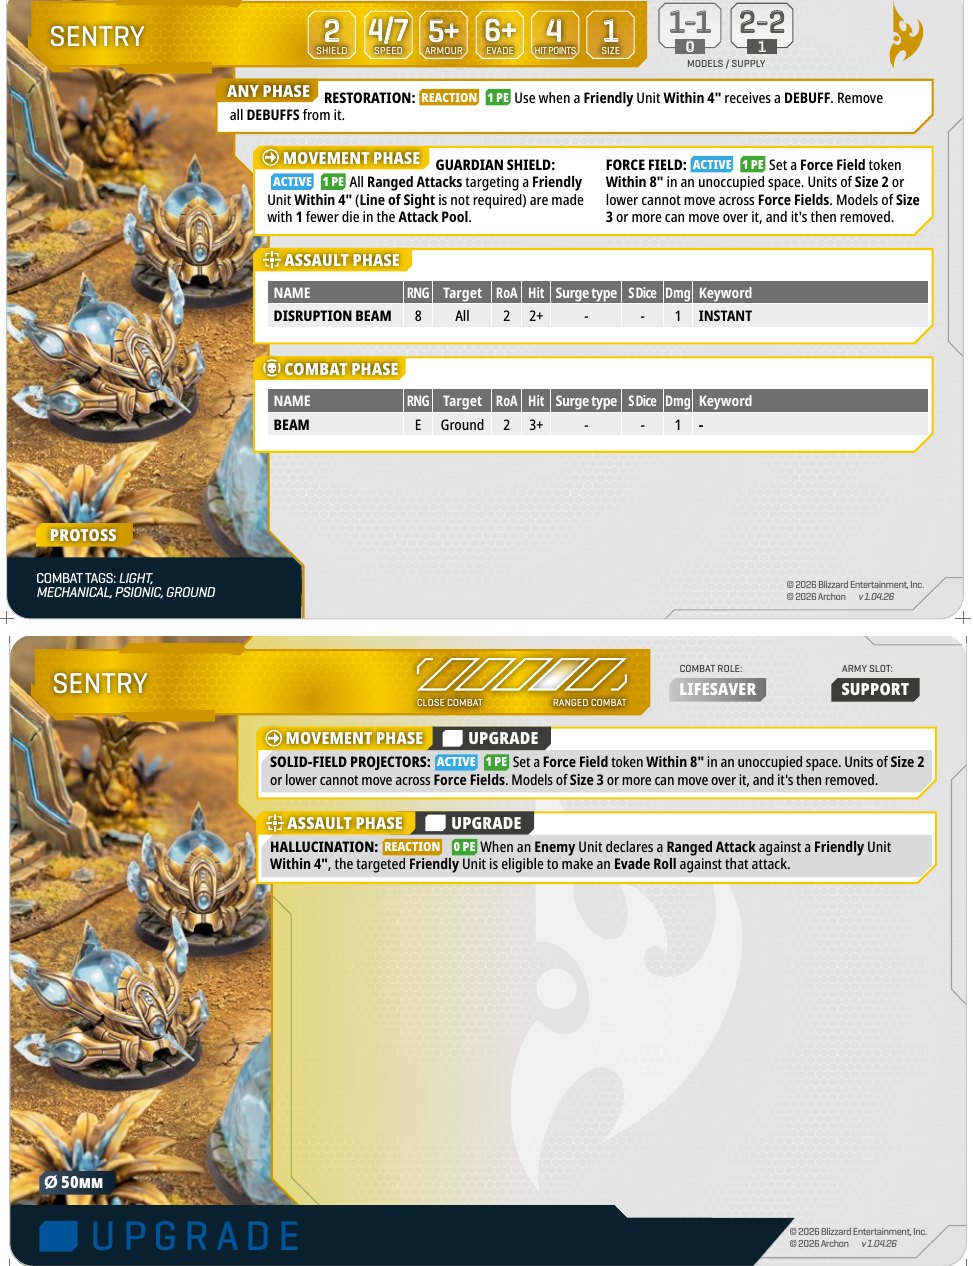
- (Sentry · 1 PE, Movement Phase): all Ranged Attacks targeting friendly units within 4" have 1 fewer die in the Attack Pool (per batch, per the FAQ, and that includes batches). It hurts multi-weapon shooters most: the Goliath loses 3 dice, a Marine squad loses 1.
- (Sentry · 1 PE): a token within 8" that Size 2-or-smaller units cannot move across (the FAQ confirms Raptors and Roaches with can't cross either). Size 3+ models can drive over it and remove it. Use it to wall a charge lane, block a Zergling flank, or seal a marker.
- (Sentry upgrade · 20): a second ability. (Sentry upgrade · 30, Reaction 0 PE): when an enemy shoots a friendly unit within 4", that unit gets an Evade Roll.
- : 8", RoA 2, 2+, . Small but reliable.
- Size 1 means it hides behind crates.
#Elite
Stalker — 1 for 170 / 2 for 270
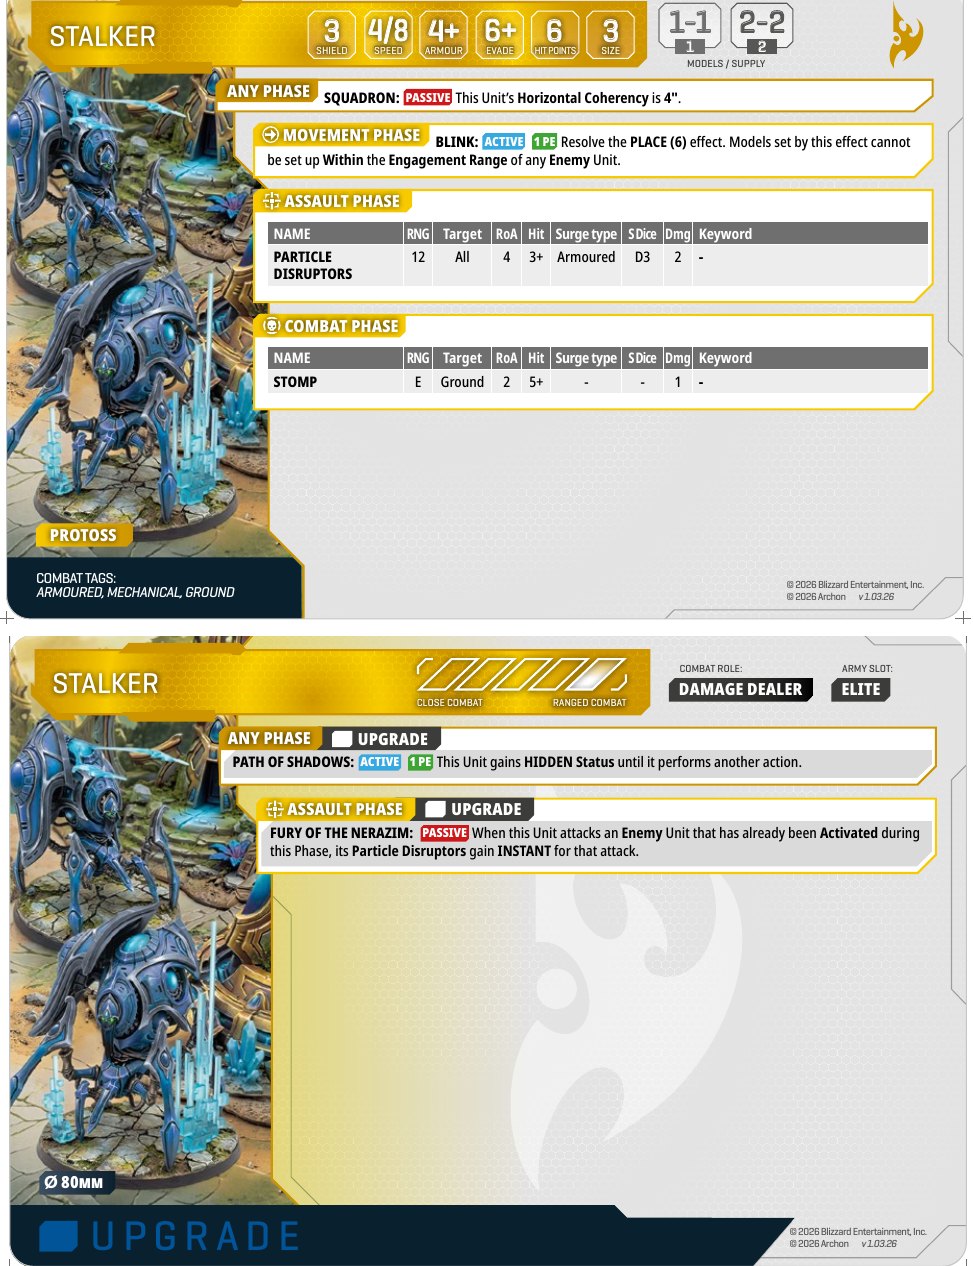
- (Stalker · 1 PE, Movement Phase): (6), not into . out of a charge lane, onto ( ignores elevation), or around a wall into LoS. With the 4" coherency from (on the Stalker card), the second Stalker of a pair can land up to ~10" from where the unit started. Move then is two separate repositionings, each with its own leapfrog.
- A pair deals ~7 damage into Marauders or ~6 into Roaches per volley, ~7 into Marines (no Surge).
- (Stalker upgrade · 20/30): vs an enemy that has already activated this phase, the gain (no (Medic), no Point Defence, no (Queen)). Easy to trigger if you activate late.
- (Stalker upgrade · 20/40, 1 PE; built into Nerazim Watchers at no cost): until its next action. → and the opponent can't shoot it from beyond 4".
- Size 3: it sees over and is seen over Size 2 walls. Siege Tank does 3 damage per die to it. Hide behind Size 3+ terrain.
Praetor Guard (Zealot) — 3 for 280 · only, Unique
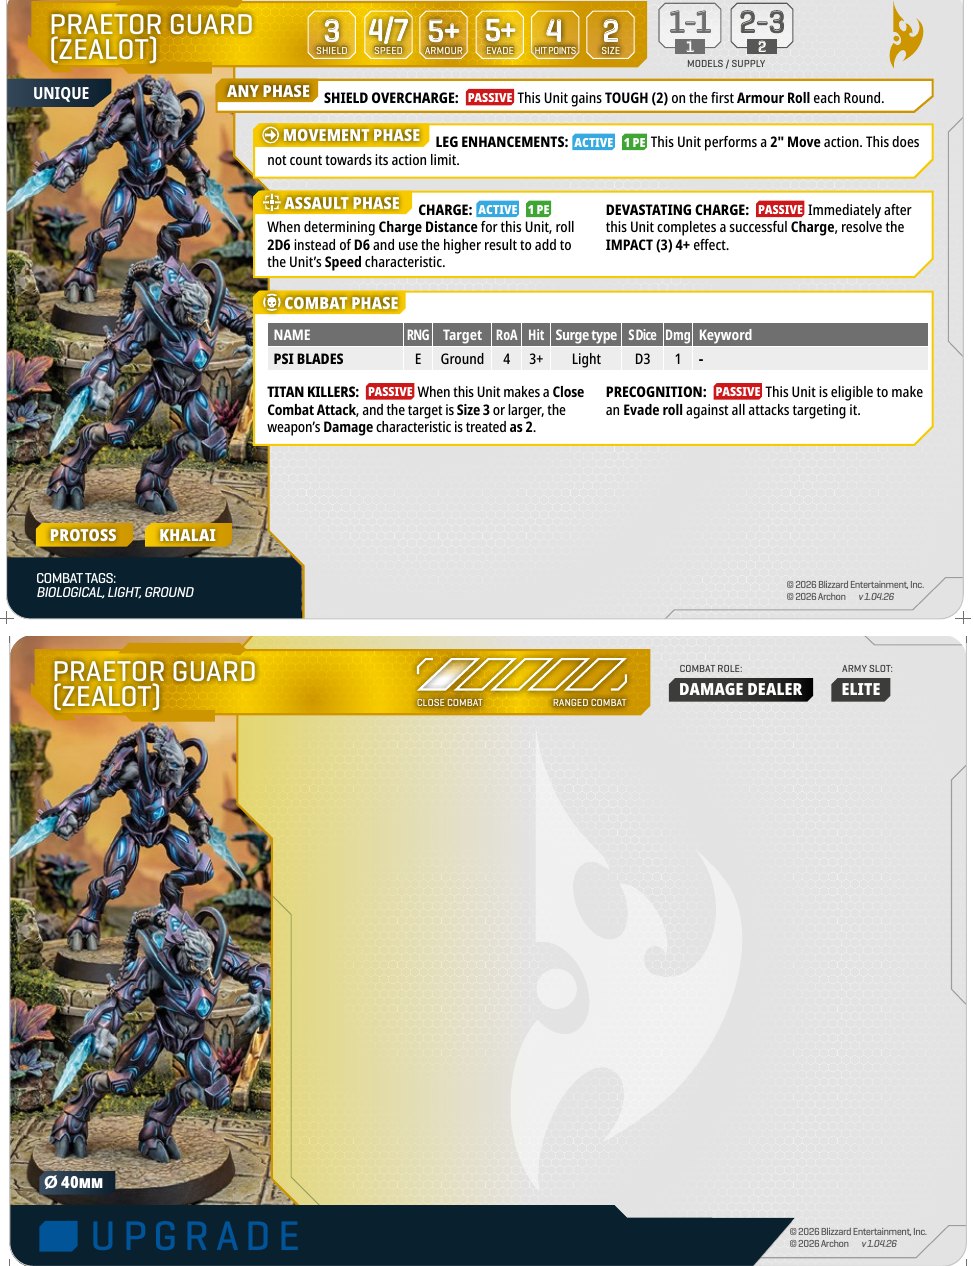
- The best melee unit in the faction. Tough to shoot, and it deletes big things.
- is built in, so a Zealot squad's 20-mineral upgrade comes free here. , and (all Praetor Guard) are its own. The Zealot upgrades (, , ) aren't options, so the 280 is flat.
Immortal — 280 · Supply 2 · Shield 6 + HP 8 = 14 on the model
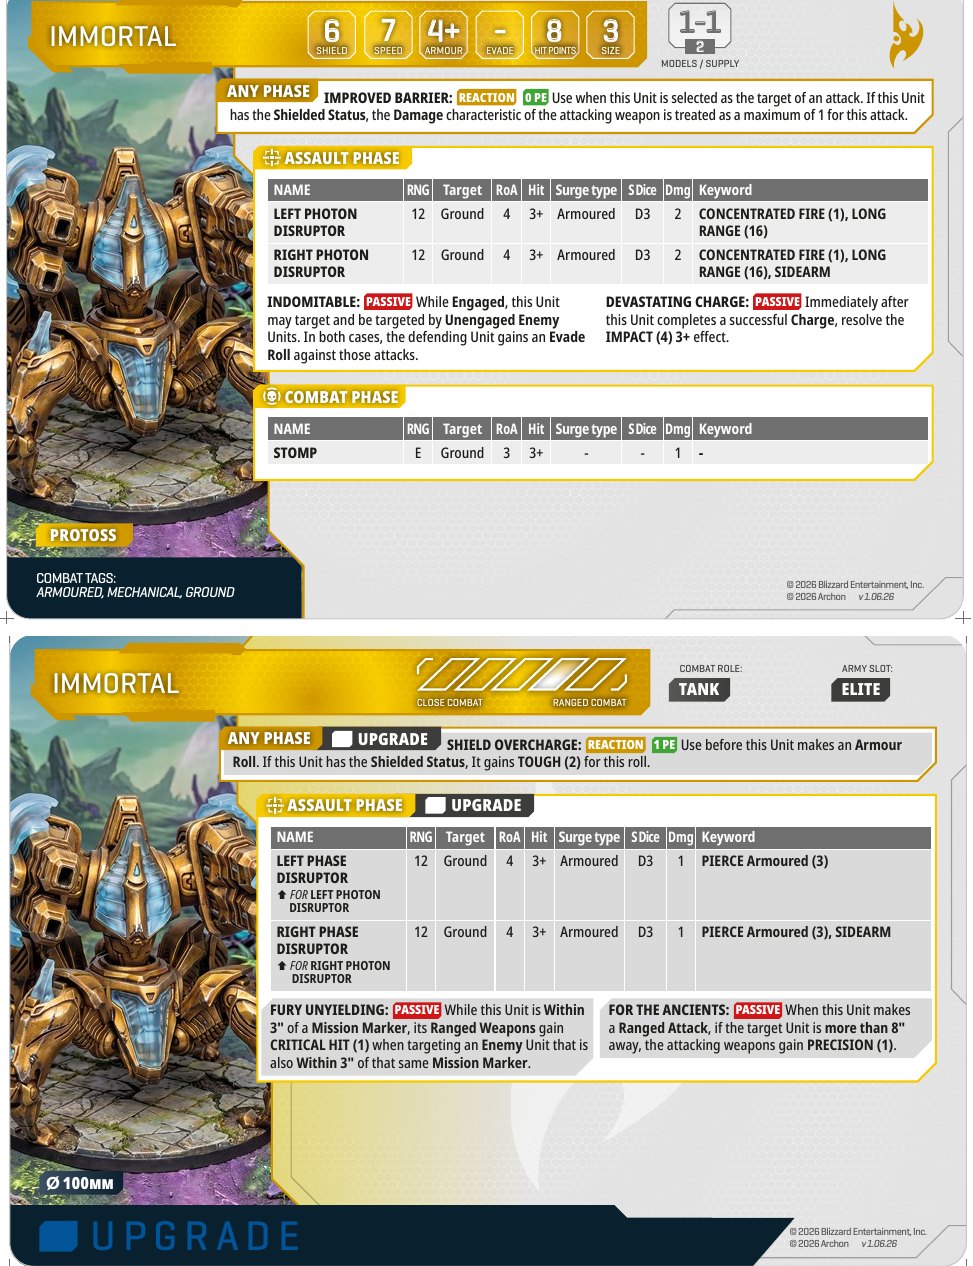
- (Immortal · Reaction, 0 PE): when targeted while , the attacking weapon's Damage is capped at 1. Marauders, Siege Tanks and Hydralisks all get neutered while the Shield holds.
- Two Photon Disruptors (the right one is a , so it fires both): each 12", RoA 4, 3+, Armoured Surge D3, Damage 2, (one kill per batch max), Long Range 16". It's a precise tool: two batches = up to two single-model kills, or break one squad's bracket.
- Phase Disruptor swaps (20 each): drop Concentrated Fire, go to Damage 1 with Armoured (3). Better into multi-model Armoured units (Marauders, Roaches) and single big targets.
- (Immortal upgrade · 20, 1 PE): (2) while Shielded. (Immortal upgrade · 20): (1) vs enemies near the same marker. (Immortal upgrade · 20): (1) vs targets beyond 8".
- (Immortal; also on the Goliath and Siege Tank): it shoots out of combat and can be shot while Engaged. (4) 3+.
- How opponents kill it: volume first (Marines, Zergling claws) to push damage past 6 and strip Shielded, then heavy weapons. Protect it from cheap dice with (Sentry) and screening.
#Heroes
Artanis — 250 · Supply 1 · tags Biological, Psionic only, so no current Surge triggers on him
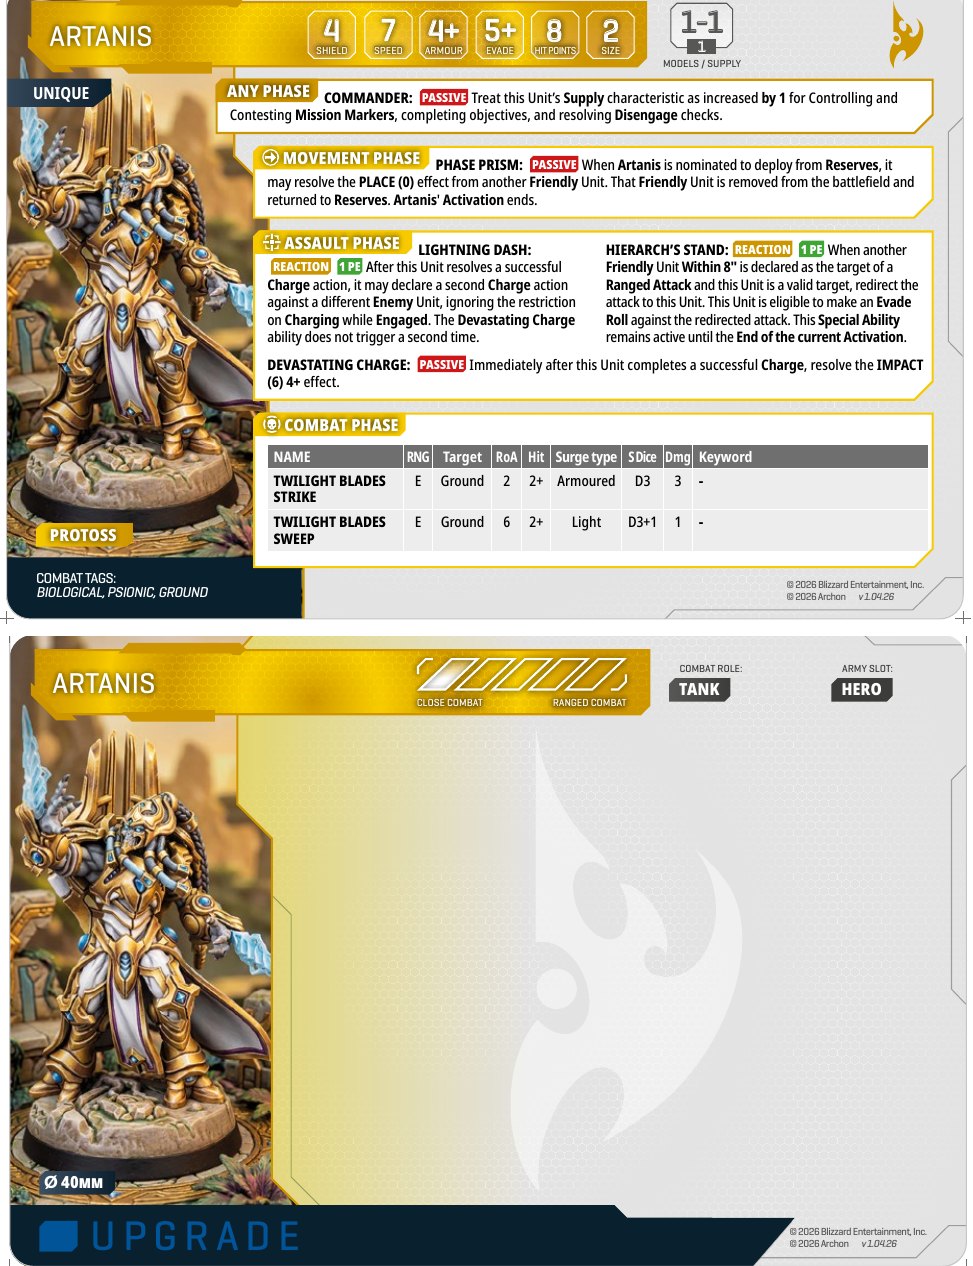
- (Artanis): when deploying, (0) from another friendly unit, and that unit goes back to . Swap a damaged unit out and Artanis in, mid-board. (FAQ: he goes in base contact with the target unit.)
- (Artanis · Reaction, 1 PE): redirect a Ranged Attack at a friendly unit within 8" onto Artanis, who gets an Evade Roll. The attacker's Surge probably does nothing to him.
- (Artanis · Reaction, 1 PE): after a successful Charge, charge a second enemy unit (no second ).
- (6) 4+. Twilight Blades: Strike (RoA 2, 2+, Armoured Surge, Damage 3) for big targets, Sweep (RoA 6, 2+, Light Surge D3+1) for infantry.
Zeratul — 230 · Supply 1 · tags Biological, Psionic only, so no current Surge triggers on him
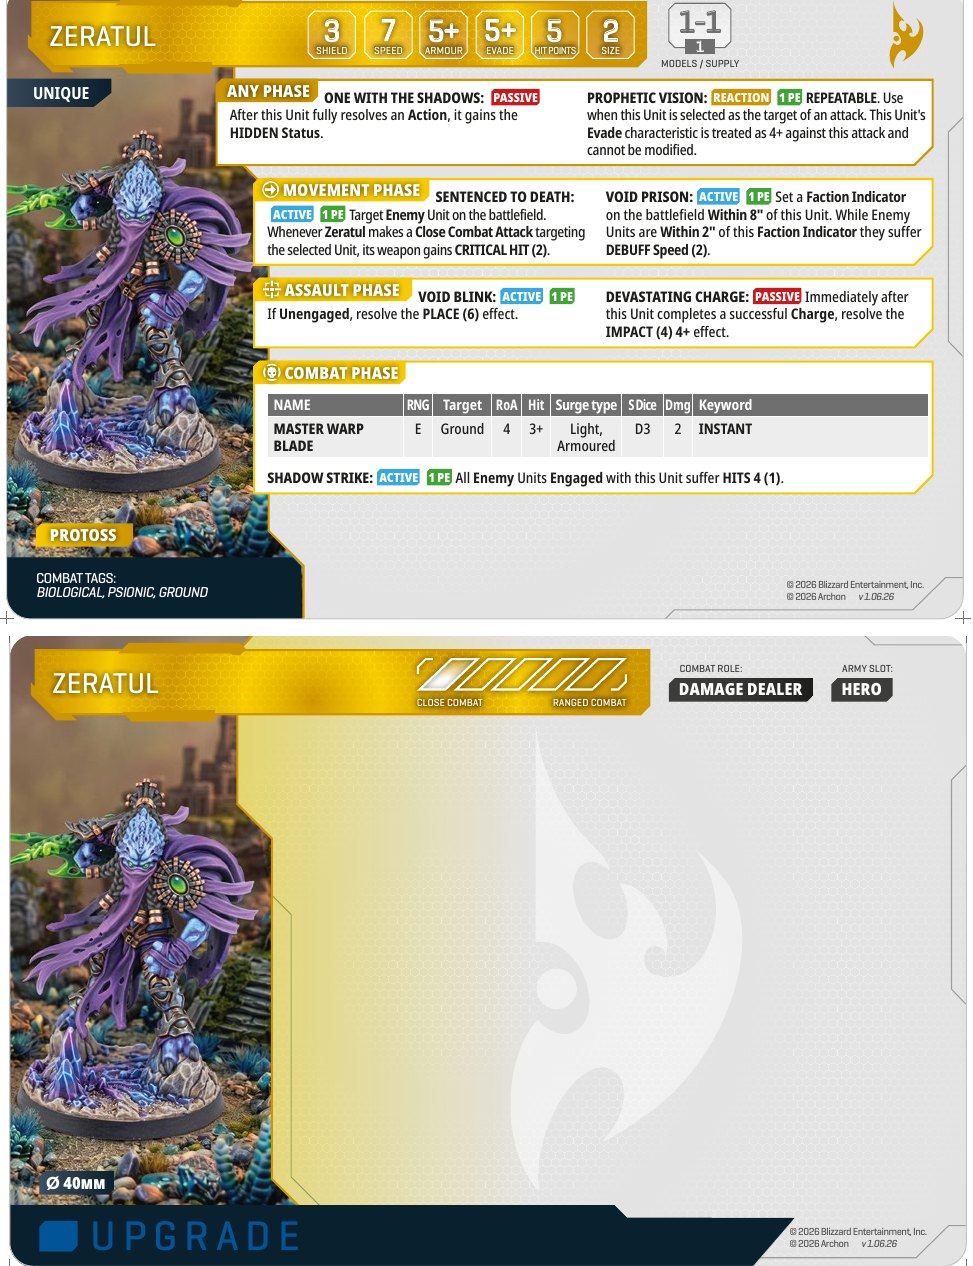
- (Zeratul): after every action he fully resolves, he becomes . He's almost never targetable from beyond 4".
- (Zeratul · Reaction, 1 PE, ): when targeted, Evade 4+ that can't be modified.
- (Zeratul · 1 PE, Assault Phase): (6), which can land in Engagement Range, so no charge roll.
- (Zeratul · 1 PE): his melee gains (2) vs one chosen enemy. (Zeratul · 1 PE): every enemy unit Engaged with him takes 4 (1).
- : RoA 4, 3+, Light/Armoured Surge D3, Damage 2, .
- In Nerazim, every time he acts and drops , can fire (once per round, card exhausts).
#Summoned
Pylon (via on the Khalai faction card): a Supply 0 Structure and forward . See Sections 3 and 13.
#Playing to Each Unit's Role
Every unit card prints a Combat Role: Damage Dealer, Tank, Lifesaver or Tactician. Treat the role as the unit's job description. Most wasted units are ones asked to do a job their card doesn't support: Damage Dealers parked on a marker eating a charge, Tanks that never touch an objective, Lifesavers standing out of range of the thing they're supposed to keep alive.
Combat Range bars. The back of each card has a 5-segment bar running from Close Combat to Ranged Combat. The rulebook (5.2) defines it as "the preferred distance this Unit seeks to maintain from Enemy Units." It's design intent, not a rule, but it tells you where the unit expects to fight. In the tables below, 1 = hug the enemy and 5 = stay at maximum range. Structures and pure support pieces show a greyed-out bar.
| Unit | Role | Range (1-5) | What it's telling you |
|---|---|---|---|
| Zealot | Damage Dealer | 1 | Charge unit. |
| Praetor Guard | Damage Dealer | 1 | Charge unit; hunts Size 3+. |
| Artanis | Tank | 1 | A melee tank: he wants to be in the fight, soaking redirected shots via . |
| Zeratul | Damage Dealer | 1 | Assassin; straight into contact. |
| Adept | Damage Dealer | 3 | Mid-range (8" ), and the Shade goes forward. |
| Sentry | Lifesaver | 4 | Behind the line; 4" bubble on the units in front of it. |
| Immortal | Tank | 4 | A ranged tank like the Marauder: hold the marker at 12-16" range and shoot. covers it when caught. |
| Stalker | Damage Dealer | 5 | Max range, to keep it there. |
| Nerazim Watchers | Damage Dealer | 5 | Unlike regular Adepts: hang back and use into combats. |
| Pylon | Tactician | — | Structure. |
Read across the faction: Protoss has the widest spread in the game, from a 1-range hammer (Zealots, Praetors, both heroes) to a 4-5 range anvil (Immortals, Stalkers, Sentries). The classic Protoss turn is anvil holds the marker at range, hammer charges whatever comes to contest it.
Tanks: the immovable objects
Immortal (Tank). The Protoss Marauder. Its job is to sit on the contested marker and be un-killable.
- Shield 6 + HP 8 means 14 effective HP at Armour 4+.
- (Immortal · 0 PE) caps every Damage-2+ weapon at 1 while Shielded. (Immortal upgrade) or () handle the volume fire that's trying to strip the Shield.
- It's Supply 2 for marker counts. (Immortal upgrade · 1 vs enemies near the same marker) turns the anchor into a punisher. (Immortal) means a Zergling tarpit can't stop it shooting.
- Pair it with a Sentry: within 4" removes a die from every incoming batch, which is often what keeps the Shield up.
- Don't run it forward alone, where Siege Tanks (3 damage per die on Size 3 once the Shield drops) and massed volume can focus it.
Artanis (Tank). A bodyguard. (Artanis · 1 PE) redirects a Ranged Attack aimed at any friendly unit within 8" onto him, with an Evade Roll. Surge never triggers on him either: every Surge in the game targets Light or Armoured, and he's neither.
- Play him 4-8" from your squishy Damage Dealers (Adepts, Sentries, a Stalker pair). Then let (Artanis · +1 Supply) and his blades win the marker fight he's standing on.
Damage Dealers: strike where it counts
Zealot. A charge unit, and once it lands, an objective-taker: Supply 2 in three models means a Zealot squad that charges onto a marker usually wins the count. Charge into what matters, not what's closest. Pair squads for (Zealot upgrade · 2 vs a target already engaged with another friendly unit).
Praetor Guard. The elite strike. (Praetor Guard · Damage 2 vs Size 3+) plus Evade vs everything make it the unit you send at Siege Tanks, Goliaths, Queens, Ravagers and enemy Immortals.
Stalker. in, shoot, or out. Its melee (Stomp 5+) is bad, so it should never be the unit that gets charged. Size 3 means cover is rare; plan the hide before the shot.
Adept / Nerazim Watchers. Printed Damage Dealers, and fine into Light targets within 8". Their bigger contribution is the Shade:
- (Adept) gives everything shooting or fighting near it (1).
- (Nerazim Watchers) strips .
- Cheap bodies for the Gather action. Watchers' lets them help a combat without joining it.
Zeratul. An assassin. after every action, (Zeratul) into the fight, (Zeratul) on the target that matters. He's not a holder (HP 5) unless the marker is already clear.
Lifesaver: project the bubble
- Sentry. (4" bubble, −1 die per incoming batch), (a free Evade), (debuff removal). Keep it within 4" of your anchor and Damage Dealers, behind them. It's Size 1, so it hides behind crates.
- Force Fields are the other half of its job: wall the charge lane before the Zerglings get there.
Tactician: the Pylon
- Pylon (Khalai). A forward Entry Edge plus a 4" PE discount. Place it Round 1, 10"+ from enemies, behind terrain, near where you'll want reinforcements and cheap and uses. It's Supply 0, so losing it costs no VP, but it costs you the warp-ins.
#5. Tactical Cards & the Gas Budget
All Protoss cards produce 1 PE.
| Card | Gas | Slots | Key ability | Verdict |
|---|---|---|---|---|
| 25 | 1 Core | ( 2, first melee weapon) | Cheap Core slot + melee buff; not unique | |
| U | 35 | 1 Core, 1 Elite | ( Speed 2) + | Excellent charge-enabler |
| U | 40 | 2 Core | : a ground unit deploys from any non-Entry table edge, >10" from enemies (only one per round) | Flank deploys |
| U | 35 | 2 Core | ( 3), (end-of-round deploy at a marker >10" from enemies) | Mobility + forward drop |
| U | 35 | 2 Core | (first weapon ); | Anti-reaction turn + Recall |
| U | 35 | 1 Core, 1 Elite | (Reaction: enemy entering from anywhere but its own takes 3); | Punishes Zerg/Terran flanks |
| 30 | 1 Elite | ( 1, reaction); (CRIT 1) | Solid; not unique | |
| U | 45 | 1 Support, 1 Elite | (after a , 2); (+4 Range on first ranged weapon) | Great with (Stalker); 16" Stalkers |
| U | 40 | 1 Core, 1 Elite, 1 Hero | ( 2, reaction); (+1 charge) | Hero slot for |
| 35 | 2 Elite | ( Mech Ground: 1 + 1) | Immortal/Stalker lists; not unique | |
| U | 25 | 1 Support | (detection, 6") | Cheap detection |
| U, | 40 | 1 Core | (return to , then Deploy immediately); () | Teleport/escape |
The gas-priority trick. At Competitive events the player who spent less Vespene Gas gets Priority (colour + choice of draft). Protoss lists often come in at 170. Take advantage.
PE is tight. You'll have ~6-7 PE per round, and almost every trick costs 1.
- What wants 1 PE: , Charge, (Zealot upgrade / Praetor Guard), (Sentry), (Sentry), (Adept / Nerazim Watchers), (Zeratul), (Artanis).
- PE doesn't carry between rounds. The job is splitting each round's PE across phases. Before the Movement Phase, decide how much to keep back:
- Assault Phase and Reactions: (Zealot), , , (Immortal upgrade).
- Movement Phase: , , , .
- The Pylon's discount is real value. Anything unspent at Cleanup is wasted.
#Card Economy: Ability or Resource?
Every card makes one decision per round: flip it for PE, or flip it for its printed ability. Which cards you don't flip for PE matters as much as which you do. A Ready card is an option you still hold: a Reaction waiting for its trigger, an Assault- or Combat-Phase ability you haven't reached yet, or a threat your opponent has to play around (Ready/Exhausted is public information). With the fewest cards and the most 1-PE tricks, Protoss feels this harder than anyone.
When each Protoss card's ability can be used:
| Window | Cards (ability) |
|---|---|
| Movement Phase only | (, ), (), (), (), (), (, ), / (), (), |
| Assault Phase | (), (), (, Reaction) |
| Combat Phase | / / () |
| Any phase | (), (), (), (), (), (), () are Reactions; () is an Active |
How to sequence it:
- Pay Movement-Phase costs (, , , , ) with cards whose abilities you aren't using this round. No flank this round? is 1 PE. Nothing hidden nearby? is 1 PE.
- A Movement-only card you didn't use is free PE for later phases. Flip , Observer or first to pay for (Zealot / Praetor Guard), (Artanis) or (Zeratul) in the Assault Phase.
- Keep the right reactions Ready for the right threats. () only matters while the opponent still has an off-edge arrival to make. () and () only matter while your Mech/Ground units are about to be shot. Exhaust the reaction whose threat has already passed.
- But don't hoard reactions. One Reaction per enemy activation, and you own a dozen ( (Immortal), (Immortal upgrade), (Sentry upgrade), (Zealot upgrade), ( faction card), (), ...). Unit-based 0-PE reactions (, , ) don't need a card at all, so keep card reactions for what those can't cover.
- Know which faction card to protect. (Khalai faction card) and usually swing more than 1 PE. Keep them Ready until you know which activation needs them. (Daelaam faction card) is once per game; after it's used, Daelaam's card is a Dae'uhl-or-PE choice.
- Charge turns need Gateway-family cards Ready for the Combat Phase. ( 2) on Zealots or Praetors is often worth more than the 1 PE you'd get from flipping the card earlier.
- Let discounts save cards. A Khalai Pylon's takes 1 PE off one ability per round within 4". A 1-PE (Stalker) or (Sentry) next to the Pylon flips no card at all.
- Card abilities need an active unit (FAQ). Once you've Passed, you can't use Active card abilities for the rest of that phase.
- Nothing carries over. Whatever is still Ready in the Combat Phase should become , or , or it's lost at Cleanup.
Read the opponent's cards too. Count their Ready reaction cards ( (), (), ) before you commit a Zealot charge or a Stalker volley. An weapon ( (Stalker upgrade), ) is your answer when they're all still Ready.
#6. Sample Lists (verified legal)
#A — "Hand of Aiur" (Khalai · 2,000 min · 170 gas · 13 Supply)
| Unit | Slot | Supply | Cost |
|---|---|---|---|
| Artanis | Hero | 1 | 250 |
| Praetor Guard ×3 | Elite | 2 | 280 |
| Zealots ×3 (, , , ) | Core | 2 | 220 |
| Zealots ×3 (, , , ) | Core | 2 | 220 |
| Stalkers ×2 () | Elite | 2 | 300 |
| Stalker ×1 () | Elite | 1 | 190 |
| Adepts ×4 (, ) | Core | 1 | 190 |
| Adepts ×4 () | Core | 1 | 170 |
| Sentries ×2 (, ) | Support | 1 | 180 |
Cards: , , , , , → 7 Core / 5 Elite / 1 Support / 1 Hero, 6 PE per round + Pylon discount, 170 gas.
#B — "Robo Wall" (Daelaam · 1,980 min · 195 gas · 12 Supply)
| Unit | Slot | Supply | Cost |
|---|---|---|---|
| Immortal (, ) | Elite | 2 | 320 |
| Immortal (, ) | Elite | 2 | 320 |
| Stalkers ×2 (Fury, ) | Elite | 2 | 340 |
| Stalker ×1 (Fury, ) | Elite | 1 | 210 |
| Zealots ×3 (, , , ) | Core | 2 | 220 |
| Adepts ×4 (, ) | Core | 1 | 190 |
| Adepts ×4 (, , ) | Core | 1 | 200 |
| Sentries ×2 (, ) | Support | 1 | 180 |
Cards: , Robotics Facility ×2, Forge, Twilight Council, Gateway, → 4 Core / 7 Elite / 3 Support, 7 PE, 195 gas.
#C — "Shadow Blades" (Nerazim · 1,970 min · 200 gas · 12 Supply)
| Unit | Slot | Supply | Cost |
|---|---|---|---|
| Zeratul | Hero | 1 | 230 |
| Nerazim Watchers ×4 | Core | 1 | 210 |
| Nerazim Watchers ×4 | Core | 1 | 210 |
| Stalkers ×2 (Fury, ) | Elite | 2 | 340 |
| Stalkers ×2 (Fury, ) | Elite | 2 | 340 |
| Immortal () | Elite | 2 | 300 |
| Zealots ×3 (, ) | Core | 2 | 180 |
| Sentries ×2 () | Support | 1 | 160 |
Cards: , , Gateway, , Forge, Observer, Twilight Council → 4 Core / 7 Elite / 2 Support / 1 Hero, 7 PE, 200 gas.
#7. Signature Combos
Each combo is laid out the same way: what you need, how to run it, what it gets you, and what the opponent will do about it.
Khala Hammer ().
- Needs: two Zealot squads with (Zealot upgrade) and (Zealot upgrade), or one such squad plus Praetor Guard (which can't take those upgrades but hits harder), the Khalai faction card Ready, and 1 PE per (Zealot / Praetor Guard).
- Do it:
- Assault Phase: the first Zealot squad charges. Charge is best of 2D6, +2 Speed from (), +1 from () if you have it.
- (Khalai faction card) immediately activates the second squad or the Praetors into the same target, before the opponent can react.
- Payoff: 12 dice at 4+ per squad (~6 hits into the Armour Pool each), and gives both squads (2) because the target is with another friendly unit.
- Watch for: (Marauder) shortening the charge (two Marauder squads = two shells), (Marine upgrade) Evade vs , and Roaches counter-charging with Armour 3+.
Shade Strike.
- Needs: an Adept or Nerazim Watchers squad and 1 PE for (Adept / Nerazim Watchers).
- Do it: in the Movement Phase, drop the Shade within 4" of the enemy's key unit.
- Payoff: (Adept) gives everything you shoot or fight at that unit (1) this round: Stalkers, Immortals, Zealots, Artanis. At End of Round the Adepts teleport to the Shade and take the marker position for next round.
- Watch for: the opponent killing the Adepts (the Shade goes with them) or simply moving out of the Shade's 4".
-Heal-Hide (Stalkers).
- Needs: Stalkers with (Stalker upgrade / Nerazim Watchers), the card, and PE for both abilities.
- Do it: (Stalker · 6) → (Twilight Council · after a , 2) → ().
- Payoff: the Stalkers reposition, patch their shield damage and are untargetable beyond 4" for the enemy's Assault Phase. Next round, (Twilight Council) gives them 16" range.
- Watch for: detection ( (), , the Omega Worm, ) and (Kerrigan) freezing the Stalkers before they .
Artanis Swap.
- Needs: Artanis in and a damaged friendly unit on the table, ideally on a marker and one hit from losing Supply.
- Do it: deploy Artanis with (Artanis) onto that unit. It goes back to Reserves.
- Payoff: the kill is denied, Artanis appears mid-board with (+1 Supply) on the marker, and (Artanis) protects the squishy unit next to him.
- Watch for: weapons, which can't be redirected, and baiting of with a cheap attack. Redeploy the recalled unit before the end of Round 5.
Immortal Shield Discipline.
- Needs: a Immortal, and ideally (Immortal upgrade) or a card.
- Do it: read each incoming weapon profile:
- Heavy weapon (Damage 2+): fire (Immortal · 0 PE).
- Cheap dice: fire ( 2) or (Robotics Facility · 1 + 1) to keep the Shield up.
- Payoff: 14 effective HP that heavy weapons barely dent while the Shield holds.
- Watch for: multi-weapon shooters (Goliaths) forcing you to choose in one activation, volume fire stripping the Shield first, and attacks that switch the Reactions off.
Ambush.
- Needs: Zeratul ( after every action), the Nerazim faction card Ready, and PE for , and (all Zeratul).
- Do it:
- In the Assault Phase, him into ( can end engaged in the Assault Phase).
- He loses when he acts, so (Nerazim faction card) fires.
- In combat, hits every unit he's Engaged with for 4.
- Payoff: his first weapon gets (2) from (Nerazim faction card), on top of his and the (2) from .
- Watch for: detection near the target, cheap units fed to him to soak , and (Marine upgrade) Evade vs the ability damage. Check the exact timing of "loses " vs "first weapon used" with your TO; the cards don't spell out the window.
the Charge Lane.
- Needs: Sentries with (Sentry upgrade) and 2 PE.
- Do it: when the Zergling, Raptor or Zealot wave is one Move away, put two (Sentry) tokens across the charge path.
- Payoff: Size 2 or smaller can't cross, and charge distance is measured along the path around them, so a 7" charge can become impossible.
- Watch for: Size 3 models (Queens, Ravagers, Goliaths, Immortals) driving through and removing them, and charges from an angle you didn't wall.
/ Pylon Forward Warp.
- Needs: the Khalai faction card in Round 1 and the card.
- Do it: place the Pylon with (Khalai faction card) >10" from enemies in Round 1; it becomes an from Round 2. The Warp Prism's (Warp Prism) adds an end-of-round deploy.
- Payoff: two forward arrivals per round that skip the walk up the board. The Pylon arrival is immune to () and to (Orbital Command).
- Watch for: enemies crowding the Pylon's base, (Praetor Guard) and on the Size 3 Pylon, and a model standing on the Warp Prism's Faction Indicator.
#8. Strengths & Weaknesses
Strengths
- Every unit is efficient and protected by shields and Reactions.
- Supply density: Zealots (Supply 2 in 3 models), Stalkers and Immortals win marker counts with few bodies.
- The best heroes: Artanis (tank/redirect/double charge) and Zeratul (untargetable assassin), and no Surge in the game triggers on either.
- Mobility and denial: (Stalker), , Shades, Pylons, , Force Fields, Recall effects.
- Access to to bypass enemy defensive Reactions.
Weaknesses
- Few activations. The opponent will often see all your moves before committing theirs. Terran and Zerg can pass later and still have units left.
- Every loss is expensive. One dead Immortal is 280 minerals and 2 VP.
- PE-starved. Your best tricks all cost 1 PE and you have ~6-7.
- Shields are front-loaded on the first model and don't heal back to "".
- Size 3 Stalkers and Immortals struggle to find cover.
- Zealots and Adepts are Light, so they eat Marine Surge and Zergling Claws.
#9. Round-by-Round Game Plan
Standard missions: 6 Supply in Round 1, +2 per round, unlimited in Round 5. Anything still in at the final Scoring Phase is scored as destroyed.
- Round 1 — Establish, don't expose. ( faction card) >10" from enemies. Sentries + one Zealot squad (Supply 2 + 1) to contest your markers. Adept Shade forward. Keep Stalkers and Immortals out of LoS or out of range.
- Round 2 — Pick fights. Stalkers into range of the unit that's one casualty from a breakpoint. (Sentry) the cluster. (Sentry) the flank the Zerglings will use. Your first Zealot charge goes into something that can't Concussive Shell it.
- Round 3 — The hammer. (Khalai faction card) double activation, Artanis swap, Zeratul , flank. Take enemy-colour markers with Supply-2 Zealots and Artanis's .
- Round 4 — Preserve. ( / ) or ( faction card) damaged Supply-dense units to deny VP (redeploy by Round 5). (Daelaam faction card) the unit about to drop a bracket.
- Round 5 — Everything on. Unlimited Supply. Warp everything in; Pylon and get your last units onto markers.
#10. Missions & the Draft
| Mission | Protoss read |
|---|---|
| Hold Position (1 VP own/neutral, 2 VP enemy-colour, from R2) | Great. Supply-dense units hold markers; sticky control rewards not losing them. |
| Divide and Conquer (quarters by Supply, Marker 5 = 2 VP, 4 rounds) | Great. Few units, lots of Supply each: easy to be a quarter and still win it. |
| Artefact Hunt (carry enemy/neutral markers home, 4 VP each at end of R5) | Good. Durable carriers, and Artanis's +1 Supply stops Engagement drops. FAQ: Adepts can't while carrying. Watch the drop triggers: a ( (Stalker)!) forces a drop. |
| Frontlines (+2 for flipping) | Good for (fast charges), okay for . |
| Gather the Resources (Gather action +1 VP per unit) | Weak. You have the fewest units to Gather with. Adepts and Watchers are your gatherers. |
| Supply Drop (random marker activations) | Mixed. , Pylon and help reach it; low model count hurts. |
Draft advice. Bring Hold Position + Divide and Conquer. Ban Gather the Resources when the opponent brings it. Protoss lists often spend less gas, so use Priority to take Mission control.
#11. Matchups
#vs Terran
- Their plan: volume of fire, Marauders and Siege Tanks into your Armoured units, Medic damage erasure, ( faction card) / (Jim Raynor) tempo.
- Threats: Marauders (Armoured Surge, 2) and Siege Tanks ( damage = Size, so 3 per die on Stalkers and Immortals) are your Stalkers' and Immortals' worst enemies. (Immortal) caps them at 1 while , which is why the Terran player will shoot Marines at the Immortal first. Answer with (Sentry) and screening.
- Medics: is a Reaction. (Stalker , Sentry beams, Zeratul, ) switches it off, along with the Point Defence Drone.
- (Marauder · −2 to your charge) is real. Charge from more than 8" away from the Marauders, or kill them first.
- () punishes flanks and .
- Terran heroes: your Surge won't trigger on Raynor (no Light or Armoured tag); (Praetor Guard) don't apply (he's Size 2). Kill him with Artanis Strike or Zealot volume.
#vs Zerg
- Their plan: arrive fast ( (Zerg unit upgrade), , Omega Worm), hide (Burrow), then stacked- charges.
- (Sentry) tokens stop Zerglings, Raptors and Roaches with . The FAQ is explicit. It's your best tool.
- Detection: Observer's and Nerazim Watchers' Shade strip from Roaches. Then Stalkers (Armoured Surge) and Immortals kill Roaches efficiently.
- Hydralisks are the Zerg unit that trades best with you (Light and Armoured Surge, Damage 2). (Immortal) blunts them on the Immortal; prioritise Hydras with Zealots and Adepts (they're Light and Size 2).
- (Ravager): don't leave units standing still in 1" of a token at the end of the Assault Phase. It's damage from an ability, so ( faction card) works on it.
- Kerrigan's (Kerrigan) can freeze your (Stalker) turn. Keep a second Stalker unit ready.
- (Overcharged Nexus) hits Six Pool , () and other off-edge arrivals, but not Omega Worm deploys.
#vs Protoss (mirror)
- Strip Shields with high-RoA Damage-1 weapons (, ) before committing Damage-2 guns into (Immortal).
- is huge in the mirror; everyone has defensive Reactions.
- Watch the opponent's Pylon. It's Supply 0 but it's their forward . Praetors' (Praetor Guard) do 2 per hit to it (Size 3).
#12. Countering Enemy Signature Plays
Every faction guide in this set lists its own signature combos. These are the answers from the Protoss side. Remember that Ready/Exhausted cards are public, so check their face-up cards to see a combo coming.
#vs Terran
Double-Move Stim Push (~25" with leapfrog).
- the lane (Sentry): the can't cross it, and Coherency Links can't pass through it, so the push loses inches.
- (Zeratul) gives −2 Speed within 2" of its marker.
- A squad that overextends ends inside Zealot charge range. Make them pay in the Assault Phase.
- Raynor's needs him within 8"; Zeratul's ( 2) is the assassination tool.
( faction card).
- Expect it in Round 2-3. That round, (Sentry) the cluster and hide key units ( (Stalker upgrade / Nerazim Watchers), ( faction card), ()).
- Make sure (Sentry upgrade) or (Artanis) is available for the critical unit.
Coordinated Tank Strike.
- or charge the spotter (Stalker).
- A Sieged tank is Size 3, so Praetor (Praetor Guard) do Damage 2 in melee. It can't shoot units with it ( (Siege Tank)).
- Immortal photons surge vs its Armoured tag. (Immortal) most likely caps (Siege Tank) at 1.
The Medic Wall.
- switches off (Medic) and (). sources: (Stalker upgrade) Stalkers (vs units that already activated), , Sentry , Zeratul.
- Otherwise bait the once-per-round (Medic) with Adepts first.
- Nerazim Watchers () and Shade-buffed shots reach Medics behind the line.
Anchor (Jim Raynor). Out-supply it: Zealots (Supply 2 in three models), Immortals (2), Artanis's . Or take Raynor out with Zeratul.
Save. Engaged units can't , so a Zealot charge on the damaged squad locks it in.
: or .
- closes one whole side. On Gauntlet or Breach, () down the other side. On Typhoon, Meeting Engagement or Acropolis, there's always another side with free edge near your target. The Pylon and aren't table edges, so can't touch them.
- is a 6" bubble, so keep hidden units apart.
/ arrivals (Dropship): keep the Ready for ( 3) until they've made their off-edge deploy.
(Marine upgrade). Marines that paid the 1 CP for this round get Evade 5+ vs your hits and , plus (Zeratul), all round. If it's up, aim the Zealot hammer at Marauders, Medics or an unshielded squad, and let / ( cards) make up the difference.
#vs Zerg
The +3 Raptor Wave.
- Force Fields stop Raptors (FAQ) and Zerglings.
- Walk Zealots within 1" of their Tumors to remove creep: no +1, no bonuses.
- Praetor (Praetor Guard · Evade vs everything) and (Praetor Guard) soak .
- Counter-charge with Zealots; () +2 Speed gets you there.
→
- () or a Watchers (Nerazim Watchers) Shade strips .
- (Zerg unit upgrade) can't land within 10" of your models, and the Pylon counts.
- Roaches have to surface to score. Stalkers (Armoured Surge) punish them when they do.
the Anchor.
- (Ravager) is placed in the Movement Phase. Activate Stalkers late and off the tokens afterwards.
- ( faction card) cuts the hits (minimum 1). (Artanis) can't redirect , because it isn't a Ranged Attack.
and Go.
- Kerrigan's resolves on her activation. Move key units before that, or out of 12".
- ( faction card) moves a second unit before she can respond.
Hydra Trap.
- (Hydralisk) drags the Hydras towards your shooter, which puts them in Zealot charge range.
- (Immortal) caps their Damage 2 at 1 on the Immortal, and (Sentry) takes a die per batch.
Omega Shuffle.
- The Worm is Size 3, so Praetor (Praetor Guard) do Damage 2. Crowd its base.
- Kill the Queen keeping it alive with (Queen).
Turn. When their is Ready, the charged unit gets no Reactions: no , (Zealot upgrade), , (Sentry upgrade) or (). (Sentry) that charge lane.
/ (): keep (Overcharged Nexus) Ready (Omega Worm arrivals are immune).
#Mirror: vs Protoss
Khala Hammer. (Sentry) your front. Counter-charge with your own Zealots or Praetors ( rewards ganging up).
Shade Strike. Kill the Adepts and the Shade goes with them.
-Heal-Hide. (Observer) or (Nerazim Watchers) strips . Their Stalkers are Size 3 too, so cover is as rare for them as for you.
Artanis Swap / HIERARCH'S STAND.
- It's once per round, so bait it with Adepts.
- weapons can't be redirected, because no Reactions are allowed against them.
Immortal Shield Discipline.
- Strip the Shield with Damage-1 volume (, ).
- Then the key trick: once their Immortal has activated in the Assault Phase, your (Stalker upgrade) Stalkers become against it. No (Immortal), so full Damage 2 per die. Nexus does the same on demand.
Zeratul Ambush. Detection near your key units. Feed him cheap units, since (Zeratul) hits every unit Engaged with him. Volume beats (Zeratul).
the Charge Lane. Your Size 3 Immortals and Stalkers remove it by moving over it ( doesn't count).
Pylon / . Praetor (Praetor Guard) on the Pylon (Size 3). Block the Warp Prism's Faction Indicator.
#13. Terrain, Deployments & Staging
Geometry below is taken from the Standard (54" × 36") Deployment Cards and the six Standard map layouts in the Core Rules (printed pp. 116-121). Coordinates read the table landscape: 54" left-to-right, 36" top-to-bottom. The rulebook maps are printed portrait, so rotate them to match the Deployment Card. Terrain Sizes aren't printed on the layouts; agree them with your opponent before the draft (walls are typically Size 2, the Lost Temple Ramp is , shrubs are Grass, the Head Statue is Size 1).
#13.1 Reading a Table in 60 Seconds
Before the draft, walk the table and answer five questions:
- Where are the fire lanes? These are straight 6"+ corridors running from one deployment zone toward the other. Gunlines want them; melee armies want them closed.
- What hides what? Under the Full/Direct Cover rules, a Size 2 wall hides Size 2 models but never hides a Size 3 model (Stalkers, Immortals, Goliaths, Queens, Ravagers, Pylons, the Omega Worm, a Sieged Tank). Only Size 3+ terrain (the Lost Temple Ramp) or distance protects them. Size 1 models (Zerglings, Raptors, Swarmlings, Sentries, Roachlings, Kerrigan Swarm Raptors) hide behind crates and statues that hide nothing else.
- Where's the High Ground, and where are its ? Models on High Ground get Evade vs every Ranged Attack from lower down, see over almost everything, and can't be from (only through an Access Point). Raptors ignore Access Points (); effects ( (Stalker), (Zeratul), Phase) ignore elevation.
- Which gaps are under 3"? Size 3+ units can't pass gaps under 3", and Size 1-2 units can't pass gaps under 1". This includes gaps between models (FAQ). Note every chokepoint a (Sentry) or a screen could close.
- Where's the Grass? It blocks LoS but is destroyed the moment a ground unit moves through it or ends on it. Decide which patches you need intact and which you'll trample to strip the enemy's cover.
#13.2 The Six Standard Deployments
Every is 6" deep.
#Gauntlet
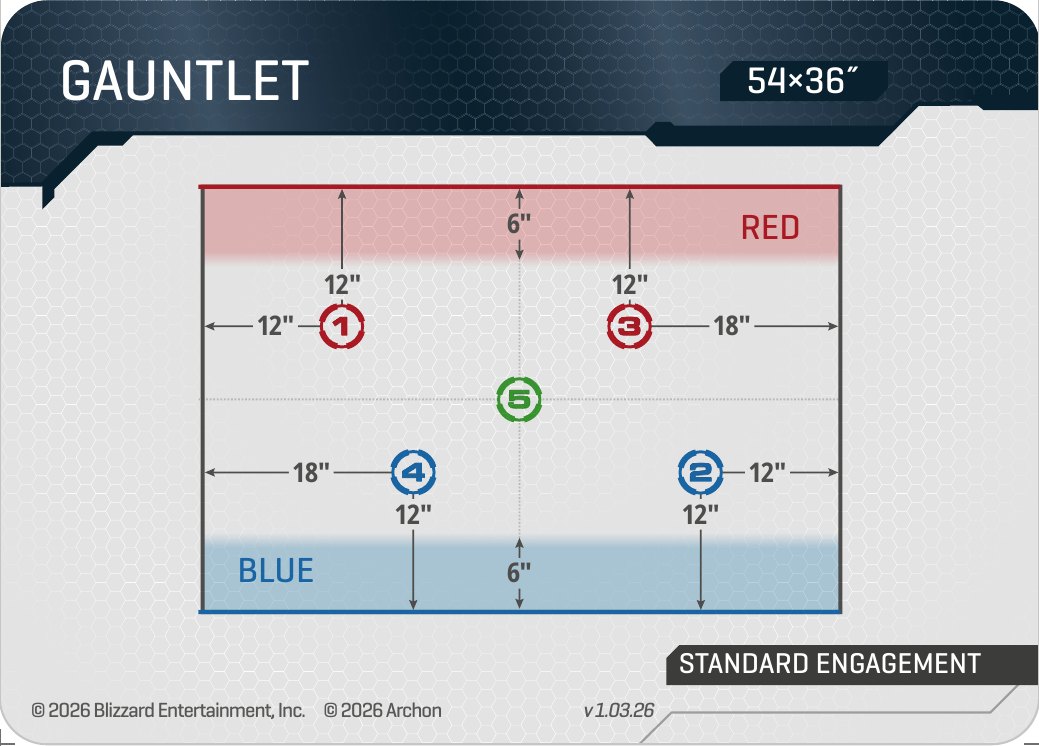
- : Red: whole top long edge. Blue: whole bottom long edge.
- Gap between zones: 24".
- Markers: Own markers 12" from your edge (Red 1 at 12" from left, Red 3 at 18" from right; Blue 4 at 18" from left, Blue 2 at 12" from right). 5 at centre.
- Free (uncoloured) edges for flank arrivals: Middle 24" of each short edge (the top and bottom 6" belong to the coloured zones).
#Typhoon
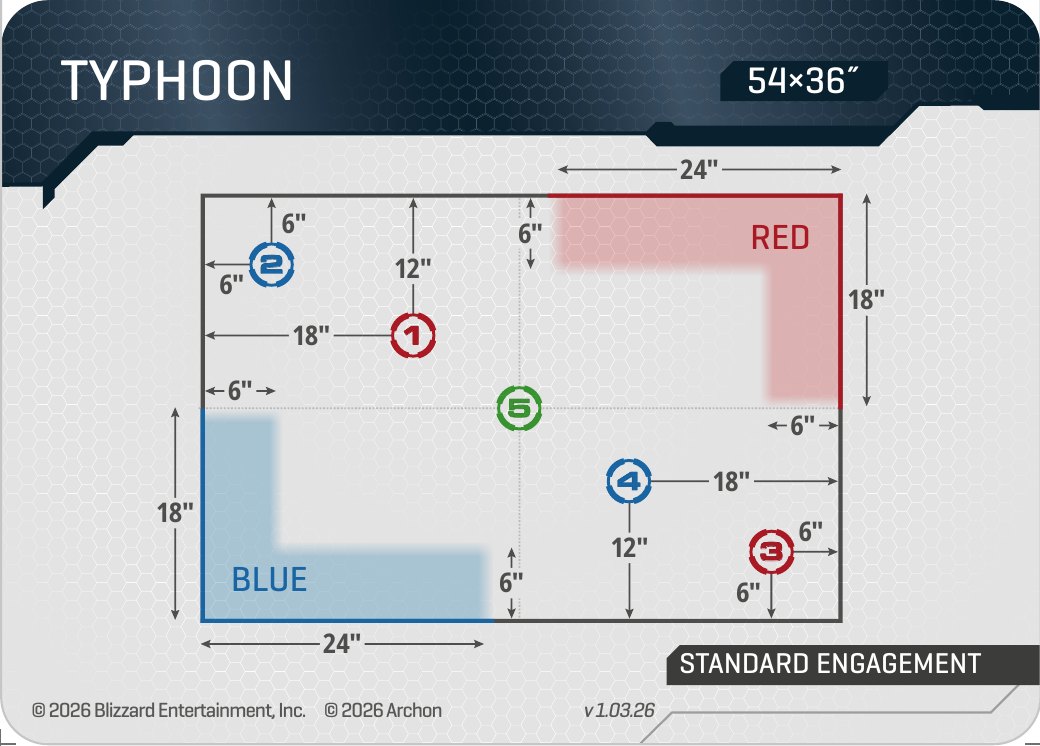
- Entry edges: Red: L in the top-right corner (24" of top edge + 18" of right edge). Blue: mirror L bottom-left.
- Gap between zones: Diagonal, long.
- Markers: Empty corners hold a pair: top-left has Blue 2 (6"/6" from the corner) + Red 1 (18" from left, 12" from top). Bottom-right has Red 3 (corner) + Blue 4.
- Free (uncoloured) edges for flank arrivals: Top edge left 30", left edge top 18", bottom edge right 30", right edge bottom 18". Both empty corners are open, right beside the marker pairs.
#Acropolis
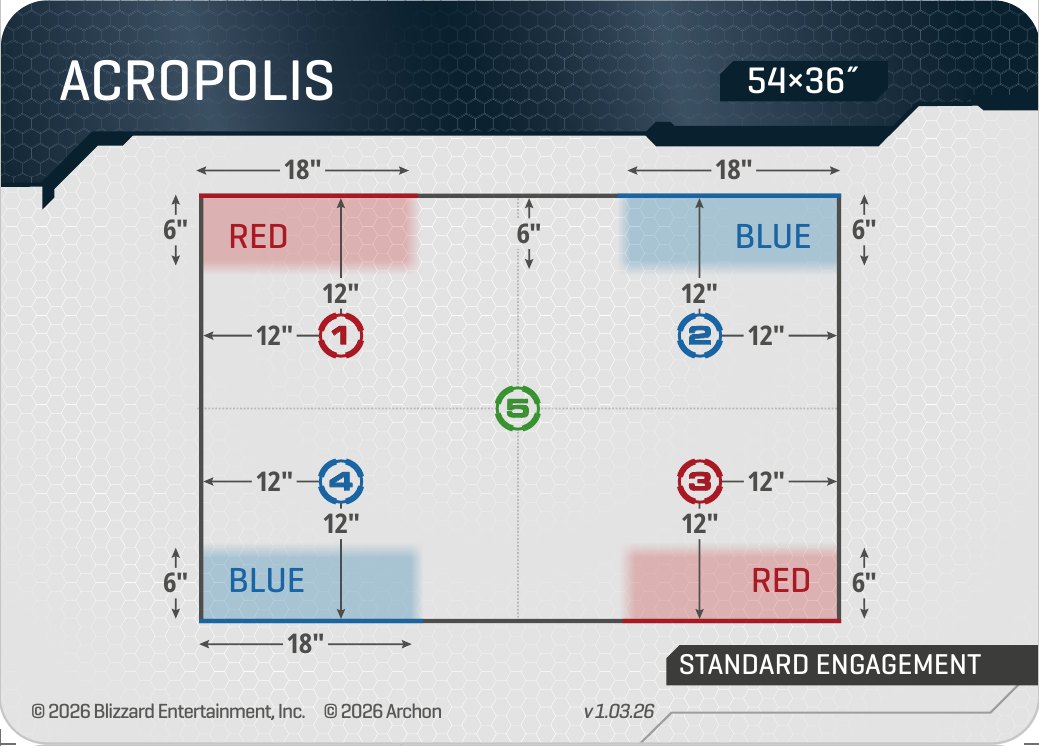
- Entry edges: Split: Red top-left 18" + bottom-right 18". Blue top-right + bottom-left.
- Gap between zones: 24" across each short side.
- Markers: Each corner zone fronts its own marker (12"/12"). Red 1 and Blue 4 sit only 12" apart on the left side; Blue 2 and Red 3 on the right.
- Free (uncoloured) edges for flank arrivals: Middle 24" of each short edge, plus the middle 18" of the top and bottom edges (between the two enemy corners).
#Proving Grounds
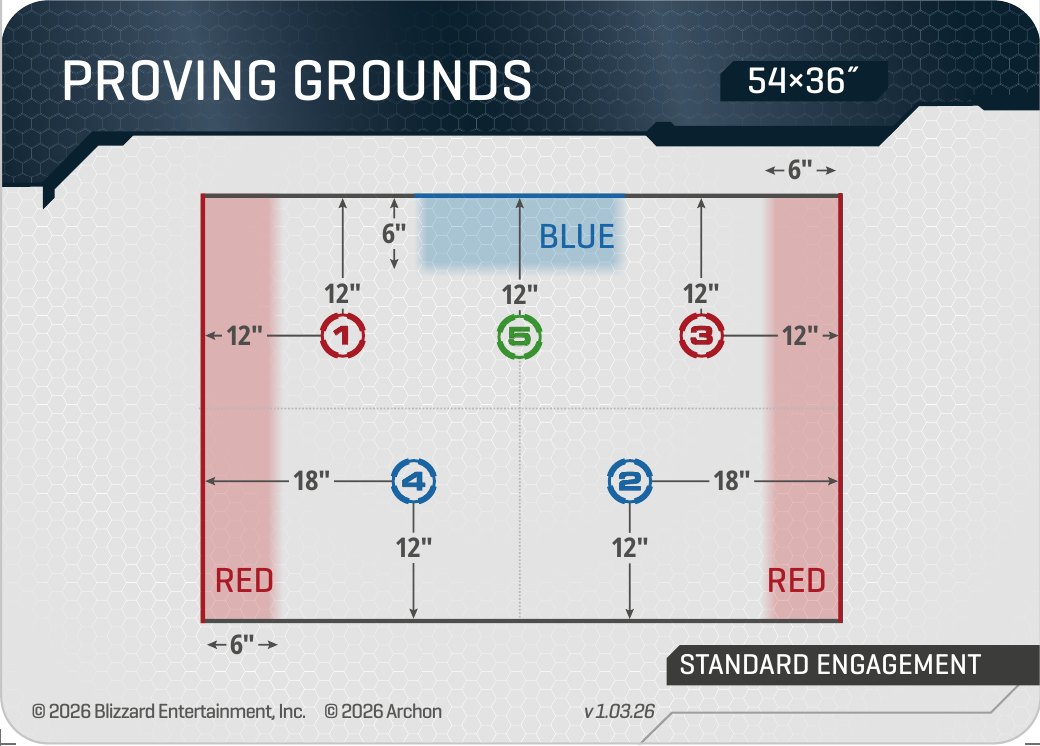
- Entry edges: Asymmetric. Red: both short edges, full length. Blue: 18" in the middle of the top edge.
- Gap between zones: 18"-24".
- Markers: Top row: Red 1, 5 and Red 3 (all 12" from the top). Bottom row: Blue 4 and Blue 2 (18" from the sides, 12" from the bottom).
- Free (uncoloured) edges for flank arrivals: Bottom edge except the 6" at each end (42"), plus 12" of top edge either side of Blue's 18".
#Breach
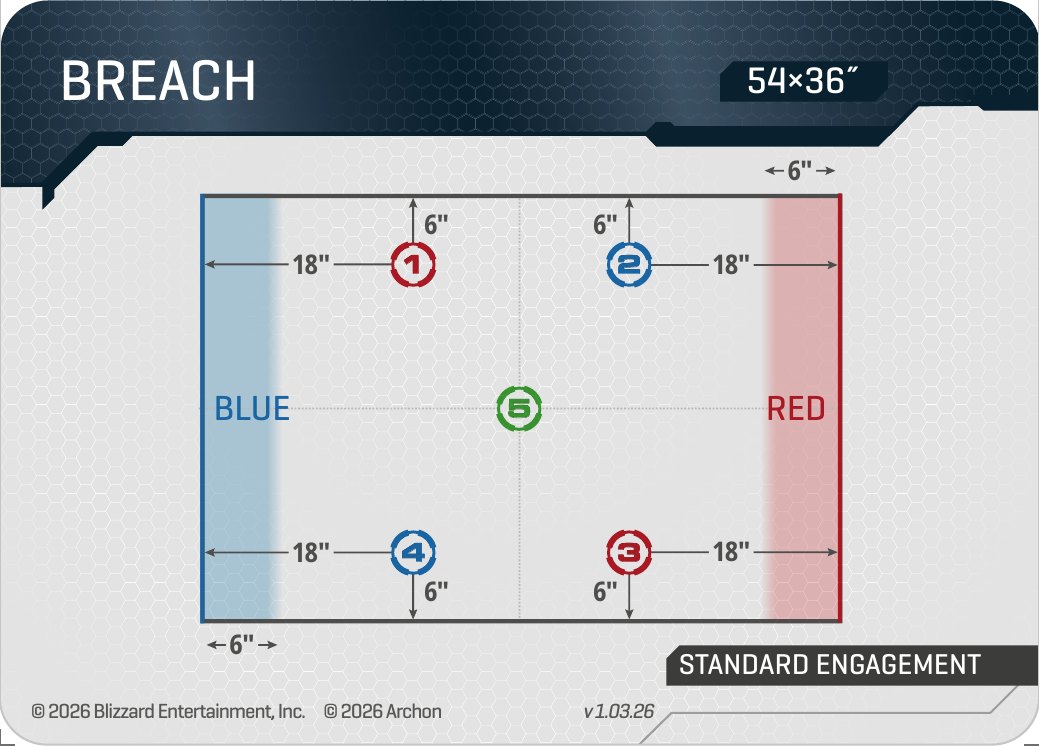
- Entry edges: Blue: whole left short edge. Red: whole right short edge.
- Gap between zones: 42".
- Markers: All outer markers are 6" from the top/bottom edges. Your half holds your own marker (bottom row) and an enemy-colour marker (top row). 5 at centre.
- Free (uncoloured) edges for flank arrivals: Top and bottom edges except the 6" at each end (42" each).
#Meeting Engagement
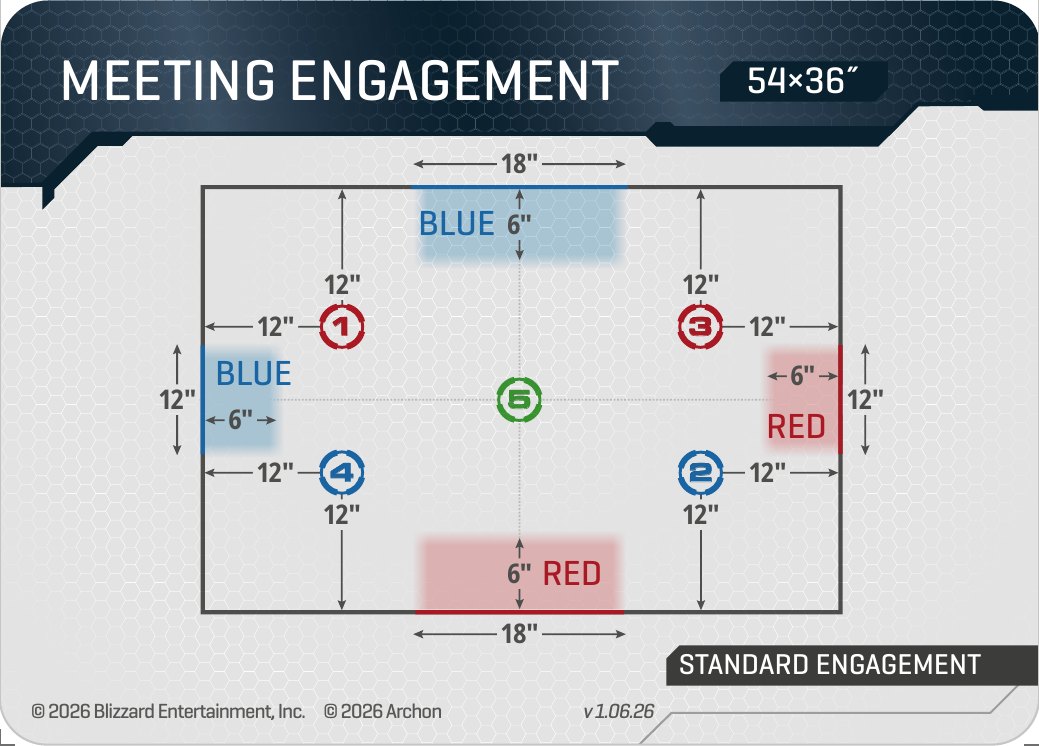
- Entry edges: Blue: 18" middle of the top edge + 12" middle of the left edge. Red: middle of bottom + middle of right.
- Gap between zones: 24" (top ↔ bottom).
- Markers: Red 1 is bracketed by both Blue zones; Blue 2 by both Red zones. Red 3 and Blue 4 are contested (~12" from one side, ~13" from the other).
- Free (uncoloured) edges for flank arrivals: All four corners: 18" of top/bottom edge and 12" of side edge either side of every coloured section.
Entry Edges are the whole red and blue rectangles on the Deployment Card, including the 6" a corner zone runs up the adjacent side. Every uncoloured stretch of table edge is legal for (), () and ( card).
() names a whole side of the table. It closes every uncoloured stretch on that side for enemy deploys this round. The flank cards can't use coloured sections anyway, so effectively shuts that entire side. How much it shuts down depends on the deployment:
- is decisive on Gauntlet and Breach (two flank sides; close the one nearest the marker they want), and on Proving Grounds (close the bottom edge and only the small top stretches remain).
- is weak on Typhoon, Meeting Engagement and Acropolis, where free stretches sit on all four sides. Typhoon and Meeting Engagement corners are reachable from two sides, so naming one side never seals a corner.
Pylons and Omega Worms work the same way: their base is an Entry Edge. A unit deploying from one starts its touching the base and moves its Speed out in any direction, then the rest are set in coherency. That's a full 360° arrival radius of Speed + 3" (Speed + 4" for units with ) around the structure, and can't touch it.
What each deployment rewards
- Gauntlet is the honest fight.
- Every unit reaches its own markers on deployment (Speed + leapfrog ≈ 7-11").
- (Zerg unit upgrade; 18 from your edge) lands exactly on the centre line, level with Marker 5.
- Flank arrivals: the enemy-colour marker 12" from a short edge is Red 1 on the left (Blue's target) or Blue 2 on the right (Red's target).
- Typhoon is two corner brawls plus the centre.
- Each player's nearer own marker sits ~13" from the tip of their L, and the paired enemy marker is right next to it.
- Both empty corners are uncoloured edge, so flank arrivals land directly on the marker pairs: Blue 2 and Red 3 sit 6" from two free edges each.
- Red flanks the top-left corner for Blue 2 (2 VP on Hold Position); Blue flanks the bottom-right for Red 3.
- Long diagonal walks favour fast units and forward deploys.
- Gunlines get the longest fire lanes on the diagonal.
- Acropolis splits both armies.
- Decide before the game which half of your army enters each corner: units that start on opposite corners can't support each other until Round 3.
- Each short side is a 24" brawl over two markers 12" apart.
- Concentrating on one side (overloading it) and conceding the other often wins Hold Position and Frontlines.
- Proving Grounds is the most asymmetric deployment.
- Blue's edge is 12" from Marker 5 and ~13" from both Red markers (2 VP each on Hold Position and Gather), but its own markers sit far away near the free bottom edge, exposed to Red's flanks.
- Blue's 18" frontage also gets crowded with big bases.
- Red has 72" of frontage and starts 6" from its own markers.
- This decides your colour choice if Proving Grounds is in the deployment pool: shooting armies with big bases want Red; fast objective armies want Blue.
- Breach is a 42" no man's land with every outer marker hugging a free edge.
- Each player has a near-free 2-VP enemy-colour marker in their own half (top row) and their own marker at home (bottom row).
- The real fights are Marker 5 and raids across.
- It's the best deployment in the game for gunlines (an extra volley before contact) and for flank arrivals (every marker is 6" from a free edge).
- Meeting Engagement: each player has an enemy-colour marker inside their pincer (Blue gets Red 1, Red gets Blue 2), worth 2 VP on Hold Position.
- The game is decided on Red 3 and Blue 4, which are almost equidistant.
- Two entry segments each means you can choose which marker each unit enters toward.
- All four corners are uncoloured edge, and every outer marker is 12" from two free edges.
- So the "safe" marker inside the enemy's pincer isn't safe: a flank arrival in that corner contests it (Red into the top-left for Red 1; Blue into the bottom-right for Blue 2), and the contested markers can be hit from their corners too.
#13.3 Mission × Deployment Hot Spots
#Hold Position
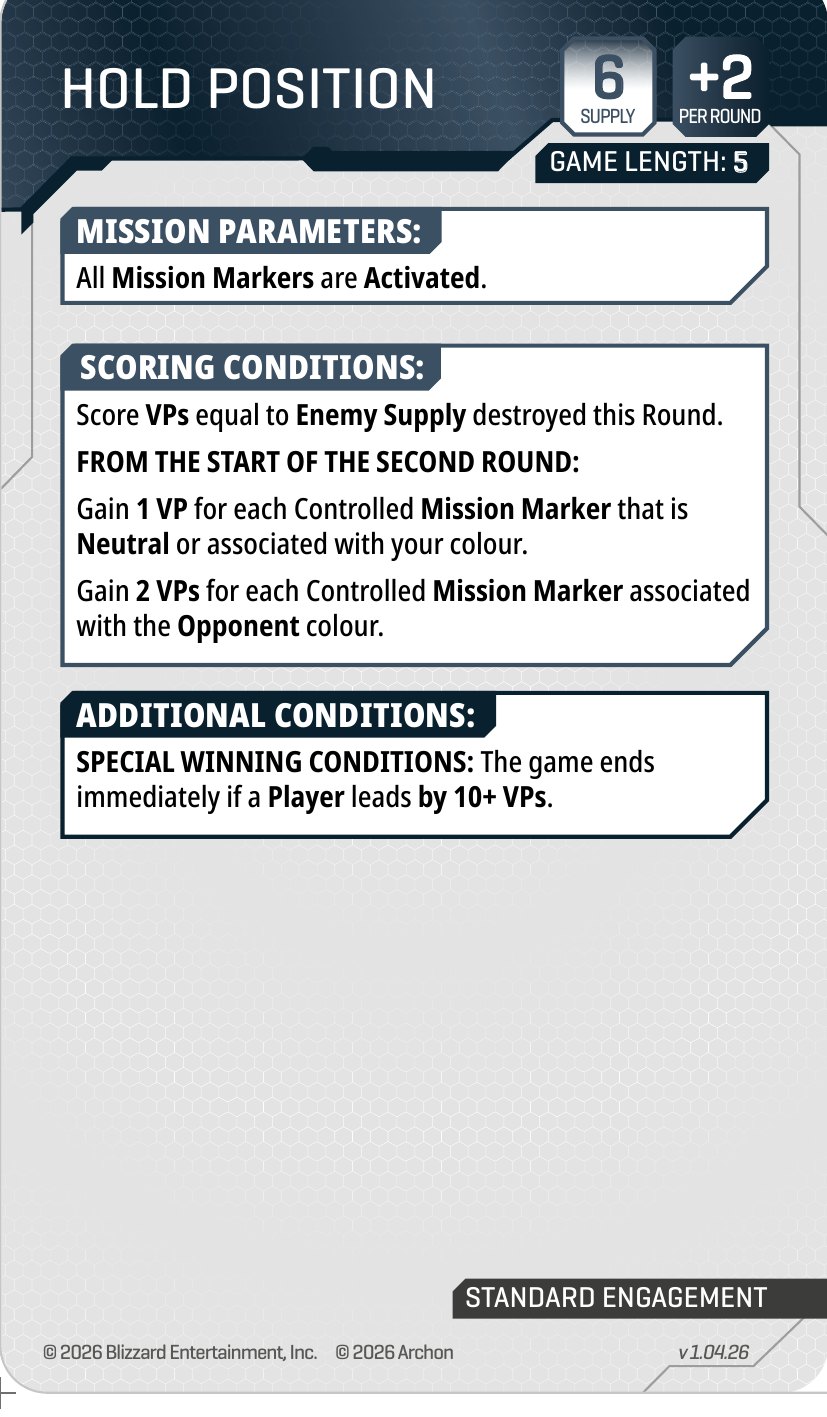
1 VP own/neutral, 2 VP enemy-colour.
- Where to stage: Lock your own markers with one durable unit each; mass the rest toward the nearest enemy-colour marker.
- Deployment notes: Breach and Meeting Engagement hand you an enemy-colour marker in your own half, so take it Round 1 and hold. On Gauntlet and Acropolis, enemy markers are 24" across: stage just outside their charge reach and take them in Round 3.
#Frontlines
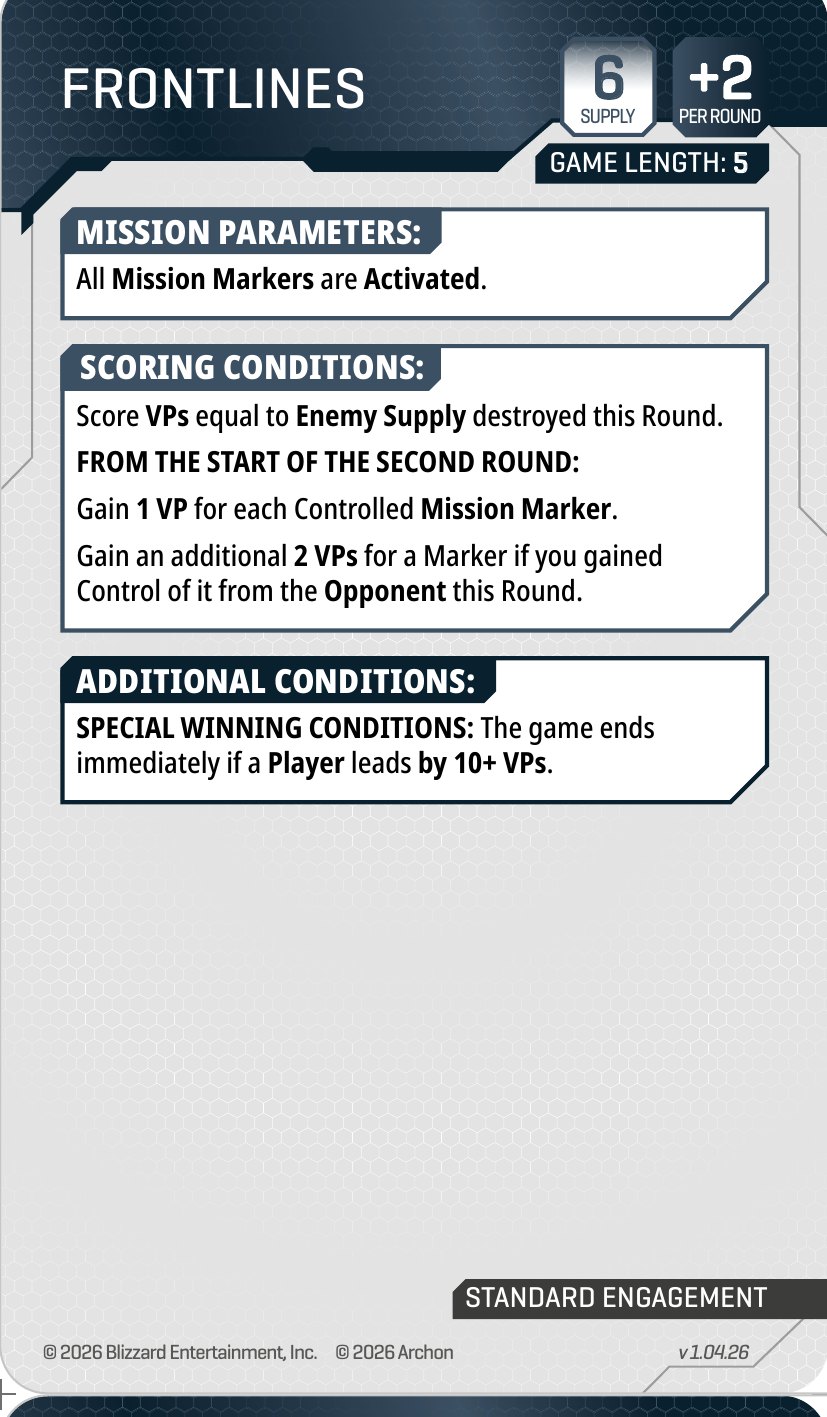
1 VP each, +2 for flipping one.
- Where to stage: Concede a marker you can retake: stage a strike unit out of LoS within reach of it, and let them take it, then flip it back (+3 that round).
- Deployment notes: Control is sticky, so the threat of a retake is half the value. Acropolis's paired markers 12" apart are made for this.
#Gather the Resources
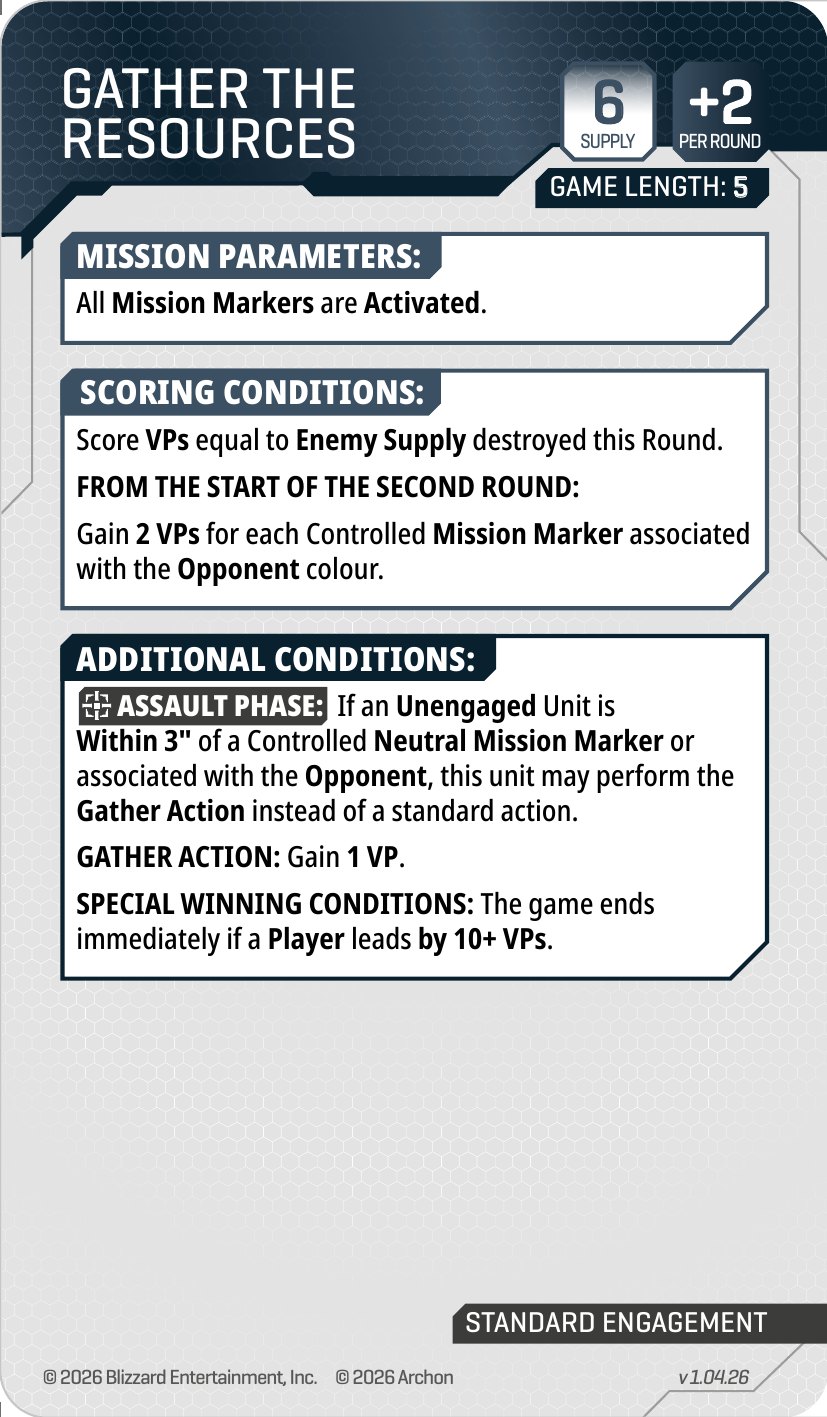
2 VP per enemy-colour marker; Gather action = +1 VP.
- Where to stage: Many cheap units within 3" of a controlled neutral or enemy-colour marker, in the Assault Phase.
- Deployment notes: Your own-colour markers are worth nothing here. Breach / Meeting Engagement give you a safe enemy-colour Gather spot. Marker 5 is the shared Gather spot, so whoever controls it Gathers there.
#Supply Drop
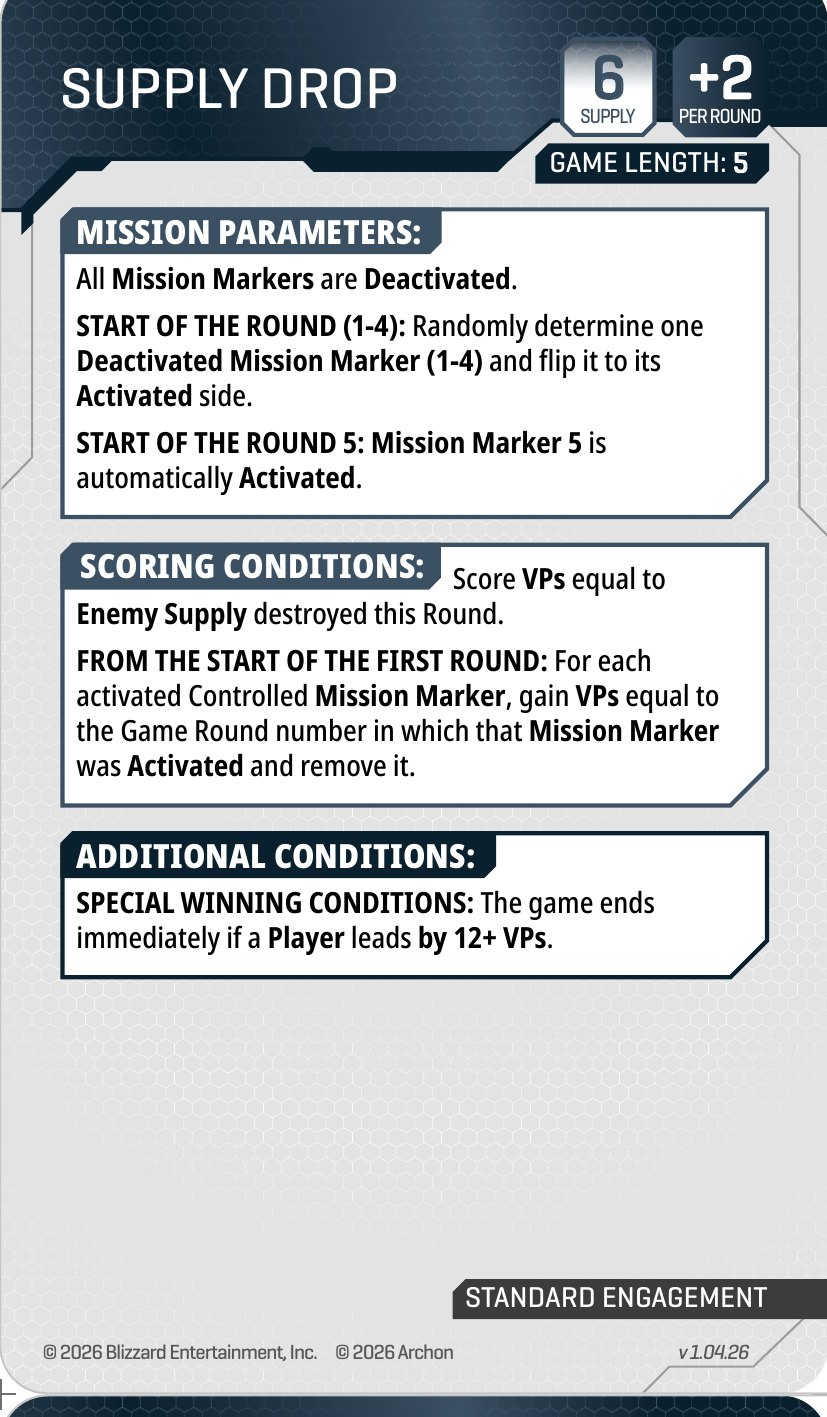
Random markers activate; score = round number, then removed; ends at 12+.
- Where to stage: Central staging that reaches any marker in one Move + Run; forward deploys parked out of LoS.
- Deployment notes: Round 5 activates Marker 5, worth 5 VP. Stage everything to reach the centre in Round 5, and remember the unlimited-Supply final round. You can pre-control a Deactivated marker (FAQ), so sitting on likely markers early pays off.
#Divide and Conquer
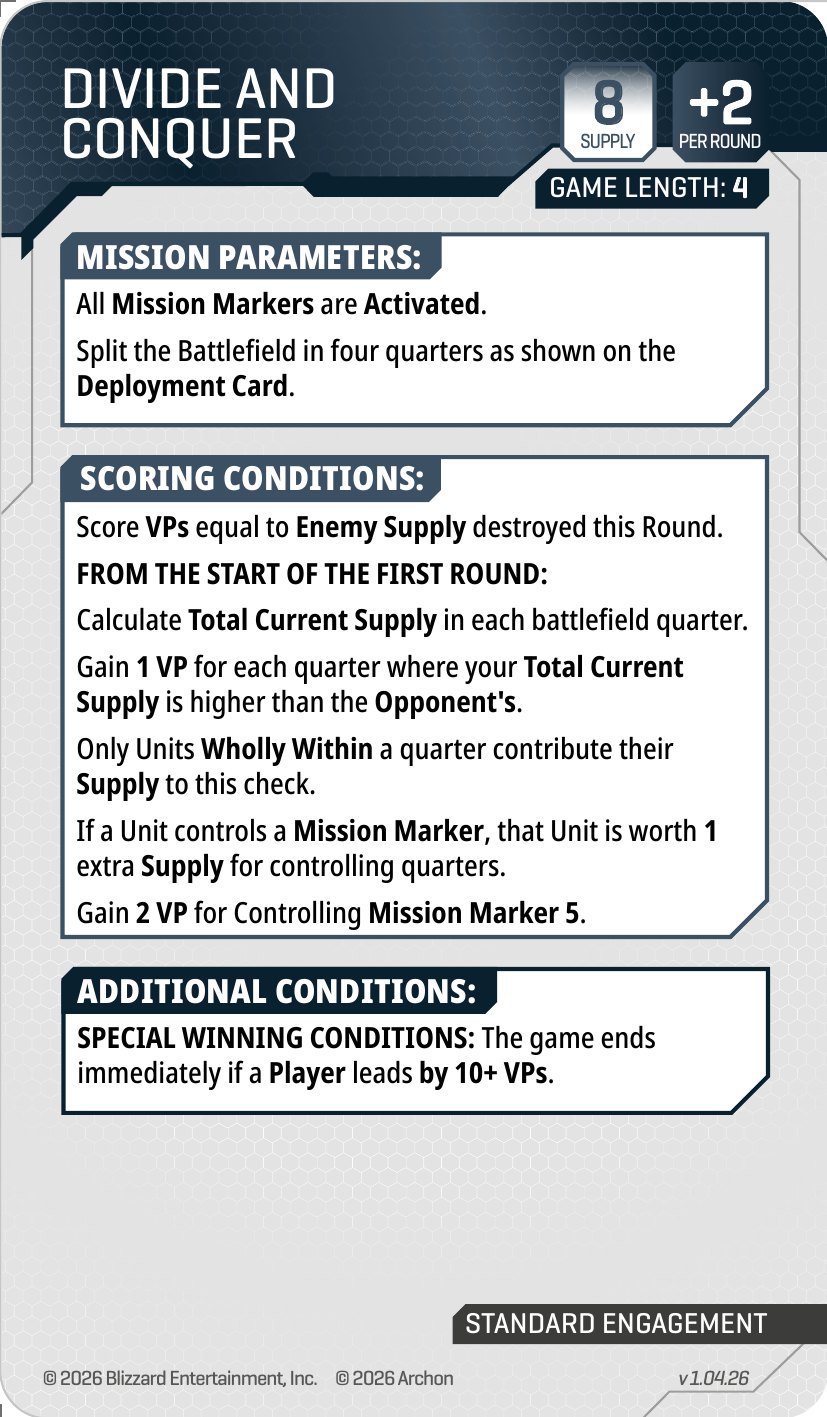
Quarters by Supply; Marker 5 = 2 VP; 4 rounds.
- Where to stage: Supply-dense units quarters; one marker-controller per quarter (+1).
- Deployment notes: Acropolis puts each army in two diagonal quarters from the start. On Gauntlet you own your two home quarters; the fight is the enemy's. Watch units straddling the centre lines.
#Artefact Hunt
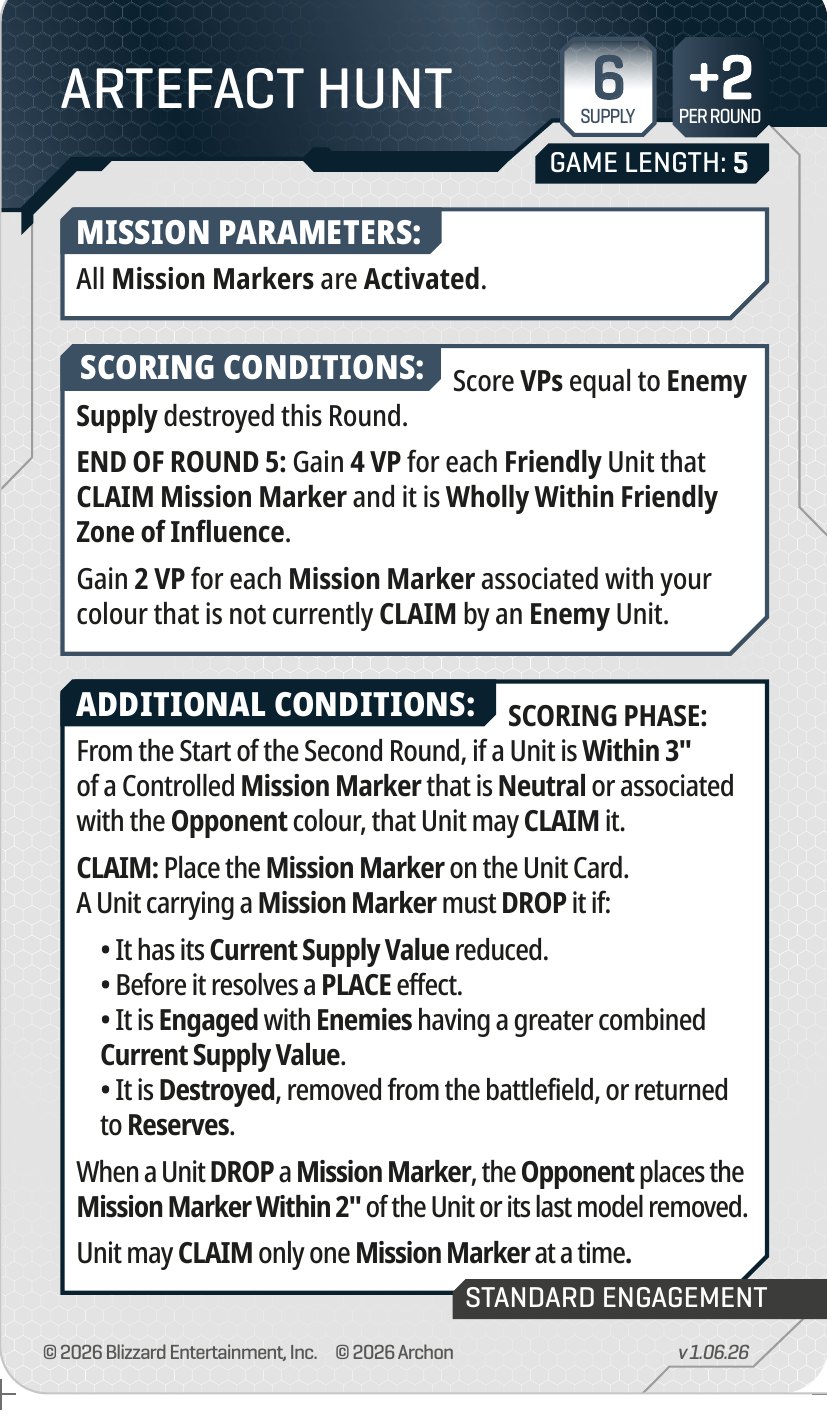
Claim enemy/neutral markers, carry home: 4 VP each at end of R5.
- Where to stage: Fast, Supply-stable carriers near the claimable markers closest to your Zone of Influence.
- Deployment notes: Breach (enemy marker 12" from your zone) and Meeting Engagement (enemy marker inside your pincer) give short carries. Carriers drop the marker when their Supply drops, before any , or when Engaged by more Supply.
#13.4 The Standard Map Layouts (Core Rules pp. 116-121)
All six use the same kit (walls, shrubs/Grass, statues, geysers, obelisks, banners) in point-symmetric arrangements. Roll a D6 or pick one; your TO will usually fix one per table.
- p.116 "Corner Bunkers": L-shaped wall corners near each flank plus a staggered central spine of diagonal walls, with geysers mid-flank. The L-corners are natural staging pockets a few inches from the flank markers; the spine splits the centre into two lanes.
- p.117 "Pens": two U-shaped wall enclosures facing opposite ways, with an open middle around the geysers. Pens are safe holding positions for Size 2 units. The open middle is a kill zone.
- p.118 "Pinwheel": walls spiral around the centre, with long walls on the central axis. The centre is cluttered (melee and Size 1 heaven); the flanks are open fire lanes.
- p.119 "Crossroads": long walls form a cross that divides the table into quadrants. Fire lanes are short, chokes are many, and every gap is a (Sentry) or screen opportunity. Strong for melee and for Divide and Conquer, where quadrant walls protect quarter-holders.
- p.120 "Temple Plateau": two Lost Temple Ramps form a long High Ground plateau down the middle. Whoever holds the plateau sees the whole board and has Evade vs lower shooters. Ground melee can only reach them through the Access Points; Raptors and effects ignore that. It's the one Standard layout where a Size 3 unit can be fully hidden (behind the ramps).
- p.121 "Twin Temples": two ramps at opposite ends. Depending on orientation they're near each player's zone (sniper nests) or on the flanks (contested High Ground).
Skirmish layouts are on pp. 122-124 (p.124 has a single ramp). Competitive events play Standard.
#13.5 Alternate-Edge Arrivals: Rules That Matter
Restrictions stack:
- The unit can never end its arrival inside the opponent's Zone of Influence.
- Flank cards require >10" from every enemy model.
- (Barracks (Proxy)) is unavailable if another friendly Bio unit already deployed this round; (Warp Gate) if another friendly Ground unit did. They have to be your first relevant deploy of the round.
- (Six Pool card) has no first-deploy limit.
Reach on arrival: the leader enters from the edge and moves its Speed, then the rest are set within 3" (4" for units with : Zerglings, Raptors, Swarmlings, Hydralisks, Ravagers and Stalkers). For Speed 4 that's about 7-8" in from the edge on the turn you arrive.
Best flank landing spots by deployment:
- Breach: anywhere on top/bottom, 6" from a marker.
- Gauntlet: left edge → Red 1, right edge → Blue 2 (each 12" in).
- Acropolis: middle of either short side, between the marker pair.
- Proving Grounds (Red): bottom edge, 12" from both Blue markers.
- Typhoon: the empty corners. Blue 2 / Red 3 are 6" from two free edges, Red 1 / Blue 4 about 12".
- Meeting Engagement: any corner. Each outer marker is 12" from two free edges, so Speed + leapfrog lands you a few inches short and an Assault-Phase Run finishes the job.
- Acropolis: also the middle 18" of the top/bottom edges, aimed at Marker 5 (18" in).
Counters to watch: (Orbital Command · Terran) closes one whole side of the table this round. () does 3 to any unit arriving anywhere but its own Entry Edge. Pylons and Omega Worms are Entry Edges, so they're immune. Opponents can stand on end-of-round Faction Indicators to waste them (FAQ).
End-of-round deploys ( (), (), ()) arrive after Scoring, so they don't score that round. They do start the next round on the table with a full Movement Phase. They also use this round's Supply Pool after casualties have freed some, so they're a way to get an extra unit down a round early.
#13.6 Protoss Staging & Forward-Deploy Playbook
Preferred deployments: Breach and Proving Grounds for the anvil (long range, few units to fit). Gauntlet and Meeting Engagement for the hammer. Divide and Conquer pairs well with any deployment because your Supply density wins quarters.
Staging principles
- Size 3 is your problem. Size 2 walls never hide Stalkers or Immortals. Use range, angles and (Stalker upgrade / Nerazim Watchers), or the Lost Temple Ramp (the only Size 3+ cover on the Standard layouts). Sentries (Size 1) hide behind anything.
- High Ground is your solution. An Immortal on the Temple Plateau has Evade vs every lower shooter, sees the whole board, and can't be Engaged from Ground Level except through the Access Points. That makes it Zealot-, Zergling- and Roach-proof (though not Raptor-proof). ignores elevation: Stalkers can straight onto the plateau.
- the chokes. Crossroads and Pinwheel have gaps a single (Sentry) seals against all Size 1-2 units. Pre-identify them during the terrain walk.
- Zealots stage behind Size 2 walls (Size 2, so they're hidden) within ~20" of their target (Move + + Charge).
Forward-deploy tools and where to use them
Pylon (Khalai) – (Khalai faction card): placed at Ground Level only, >10" from enemies. It can't use its abilities the round it lands; from the next round, one ground unit per round deploys from its base (that unit's activation ends).
- It's Size 3, so behind a ramp on the Temple layouts, or deep enough that their Round-2 shooting can't reach it.
- Within 4" of where Sentries and Stalkers will spend PE ( (Pylon)).
- On Acropolis, on the side you're overloading. On Supply Drop, near the centre for the Round-5 Marker 5.
- Leave room around the base for arriving models, and don't let enemies crowd it.
Warp Gate – : any non-Entry edge, >10" from enemies, and only as your first ground deploy of the round.
- Breach top/bottom edge onto a marker.
- Gauntlet: Blue → left (Red 1), Red → right (Blue 2).
- Proving Grounds as Red: bottom edge.
- Watch for (Orbital Command).
Warp Prism: ( 3) is a free hop over a wall or onto a marker. (Warp Prism) sets an end-of-round indicator (>10" from enemies); guard it, since enemy models standing on it waste it.
Artanis – : deploys on top of any friendly unit ( 0) and returns that unit to . Use the furthest-forward unit as the launch pad, ideally one that's damaged and close to dropping a Supply bracket.
Adept : a 12" Shade teleport at End of Round. Shades are tokens: park them out of reach so killing the Adepts is the only way to stop it.
– (): return to Reserves, then Deploy immediately from an Entry Edge. It's a back-to-base reset for a unit about to lose Supply (no VP given up), and the unit's back the same phase.
Overcharged Nexus – : every Standard deployment has uncoloured edge for the enemy to flank from (the corners on Typhoon and Meeting Engagement, too), so keep it Ready until the enemy has made their flank deploy.
#14. Niche Rules & Edge Cases
These are the rules (mostly from FAQ v1.0, some from the Core Rules) that rarely come up but swing games when they do. Know them better than your opponent.
#Movement & Positioning
- A Move or Run must change position. Moving 0" counts as Hold (FAQ). You can't "Run" a unit just to trigger something that needs a Run action.
- Directly Towards / Away moves must go the maximum distance (FAQ). Hydralisk and similar effects can't stop short.
- Gap Clearance applies to gaps between models, not just terrain (FAQ). Size 2-or-smaller units need a 1" gap; Size 3+ need 3". A screen of your models spaced under 3" apart physically blocks Siege Tanks, Goliaths, Stalkers, Immortals, Queens and Ravagers, and under 1" blocks everything on the ground.
- edges count as Impassable for Gap Clearance (FAQ), so a Size 3 model needs a 3"-wide ramp.
- Ground units can't step between High Ground pieces that aren't connected (FAQ).
- Coherency can carry models up an : non-leading models can be set onto High Ground through an Access Point with no separate move (FAQ). But High Ground Cover (Evade vs lower-elevation shooters) needs every model on the High Ground.
- You may Deploy straight onto High Ground that touches your (FAQ).
- Grass is destroyed permanently the moment a ground unit's passes through it or any model ends on it. Flying units only destroy it by ending on it. Trample the enemy's planned cover with a cheap unit.
- Charges can wrap around: Coherency Links pass through enemy models you're with, so charging models can be set on the far side of the target (FAQ).
- Disengage is lethal when surrounded. Any model that can't end strictly outside 1" of every enemy is destroyed. If the Leading Model can't, the whole Disengage fails and the leader is removed. Wrap-around charges make Disengaging very expensive.
- : a Disengaging unit with more Supply than everything it's Engaged with ignores the Disengage penalty. Heroes with (Raynor, Kerrigan, Artanis) count +1 for this check; units count as Supply 0.
- Leapfrog: see Section 2. The front of a squad advances about Speed + coherency distance per move action.
#Line of Sight & Cover
- Direct Cover works from any part of the terrain piece within 1", as long as the LoS line passes through that same piece (FAQ). The part you're touching doesn't need to be the part in the way.
- The long walls in the official map layouts are several separate pieces (FAQ). That matters for "same piece" checks like Close Quarters and Full Cover.
- Elevation Dead Zone: a ground model within 1" of the base of a High Ground piece can't see, or be seen by, a model on top of that same piece, unless they're within 3" (Close Quarters). Hug the cliff to dodge the High Ground gunline.
- Contesting a marker needs LoS and the same elevation. The marker counts as Size 0. A unit on High Ground 2" from a ground-level marker does not contest it, and nor does a unit behind a wall within 3".
- Flying models ignore Full Cover and never get High Ground Cover. Their attacks never count as coming from lower elevation.
#Attack Resolution
- Casualties are limited by visibility, not range (FAQ). A visible model outside weapon range can still be removed. But damage beyond the last visible model is discarded. As the defender, keep most of a unit out of LoS behind Direct Cover so the excess is wasted.
- Evade is rolled against Surge dice too (FAQ). Surge only skips the Armour Roll.
- Modifiers can't push a roll past 6+ or below 2+. Anti-Evade can't remove an Evade Roll entirely (FAQ).
- Surge can never move more dice than are in the Armour Pool.
- Batches are declared and resolved one at a time (FAQ). Shoot the unit you're Engaged with first; if it dies, your remaining batches can target anything.
- , and Surge apply to the whole batch, not per model. When a melee attack is split between two Engaged enemies, you choose how to allocate keyword effects across them (FAQ).
- Template gets no keywords, no Surge and no RoA modifiers. It only hits models that share at least one Combat Tag with the primary target and are on the same elevation (FAQ). (Sentry) applies to each Spillover batch separately.
- Indirect Fire only grants the target an Evade Roll if none of its models are visible (FAQ).
- needs the target to be (FAQ). Every unit starts the round Stationary and loses it the moment any model moves or is PLACEd. A unit holding still for its own buffs is exposed to (+6 RoA) and (Siege Tank upgrade · +4).
- lets you shoot into a combat, not out of one (FAQ).
- Shooting into a combat removes the rear models first (Engaged casualty priority), and never a model whose removal would end an Engagement while another valid casualty exists.
- units are immune to . A Charge doesn't need LoS or targeting, so you can charge a unit, but you get no hits from .
- A Burrowed unit that's Engaged must Close Ranks (which unburrows it) to attack in the Combat Phase. If it can't, it doesn't attack, but it can still be hit.
#Abilities, Cards & Reactions
- One Reaction per player per activation. Outside activations, it's one per trigger, and the holder resolves first when both players react (FAQ). Reactions are still once per activation (FAQ).
- Active card abilities need an active unit on the battlefield (FAQ). An exhausted card can't use any of its Reactions (FAQ).
- Abilities don't work from . No (Marine / / Marauder) or creep Speed bonus (, ) on the Deploy move, unless the card explicitly allows it ( (Raynor's Raiders), (Artanis), ()...) (FAQ).
- A unit is always within range of itself unless the text says "another" (FAQ). (Sentry), (Sentry upgrade) and (Medic / Queen / Sentry) can cover the unit using them; (Medic) and (Queen) can't.
- "While within" conditions are checked at the start and end of every action (FAQ).
- effects of the same keyword don't stack, but flat modifiers from different named sources do (FAQ).
- End-of-round deploy markers can be blocked. An enemy model standing on your Faction Indicator ( (), (), ()) wastes the deploy. The leader must be in base contact with it and the rest set outside 1" of enemies (FAQ).
- Detection works at 6" because it targets a point, not a unit, so it ignores HIDDEN's 4" targeting rule (FAQ).
- Structures (Pylon, Omega Worm, Point Defence Drone) can't be targeted by abilities, but area effects hit them (FAQ).
- When a unit is Destroyed or returned to Reserves, its tokens go with it unless they're . Kill a Ravager and its still resolves (the card says so). Creep Tumors are via the Creep Cards.
- is lost when Total Damage exceeds the Shield, not when it equals it. Non-Lethal Damage strips it too. Damage reduction applied before assignment can keep it (FAQ).
- Morphing loses Supply, and lost Supply scores (FAQ).
- Specialist weapons can't be passed to another model (FAQ). The defender chooses casualties, so keep the Specialist alive by removing other models first.
#Scoring, Time & Tournament Procedure
- Coherency is only checked at the end of a move. Casualties never put a unit Out of Coherency, so it keeps contesting even if the middle models die (FAQ).
- Deactivated markers can still be controlled (FAQ). On Supply Drop, pre-control a deactivated marker. If it activates at the start of a later round, it's already yours (sticky), and the opponent has to beat your Supply there to stop you scoring it.
- Tied Supply never changes control, and a marker never goes back to neutral.
- Mission lead thresholds end the game in the Scoring Phase, before End of the Round effects. End-of-round deploys and teleports never happen.
- Units in Reserves at the final Scoring Phase count as destroyed and score for the opponent.
- When time is called: an activation in progress is rolled back; an attack whose hit rolls are made is finished; a Battle Round cut short scores nothing. A judge reviews any game that didn't complete two full rounds. Nobody starts a new round in the last 15 minutes.
- Chess clock at zero: you may only Hold (or Deploy into your own ) in Movement and Assault. You still make Armour/Evade Rolls, fight in Combat and score. If either player wants a clock, both play on one.
- Priority: whoever spent less gas, then fewer minerals, then a roll-off. The other player picks the table side. A draft not finished 15 minutes into the round is completed randomly by a judge.
- Disputes nobody can resolve quickly: roll off (2D6). The winner decides for this instance, and you check after the game. At events, call a judge instead of playing on under protest.
- Concession and Game Loss both score as Annihilation (0 MP / 0 TP for the loser).
#Protoss-Specific Edge Cases
- The Shield sits on the first model. Shielded ends when that model is removed or Total Damage exceeds the Shield. As the defender you choose casualties, so remove the other models first while it matters ( (Immortal), (), (Immortal upgrade)).
- HP lost from Shields can be healed, but Shielded status never comes back (FAQ).
- caps the weapon's Damage characteristic, so it also blunts and very likely Siege Tank . It does nothing against Damage-1 volume.
- (Artanis) stays active until the end of the enemy's activation, so it can catch every batch the attacker fires at units within 8" of Artanis in that activation.
- (Artanis) is a (0) that puts Artanis in base contact with the unit he swaps out (FAQ).
- Deploying through a Pylon ends that unit's activation (FAQ). No (Stalker) or Charge the turn it arrives.
- Pylons and the Omega Worm are Entry Edges, so they're immune to (). Warp Prism, Proxy Barracks and similar forward deploys are not Entry Edges (FAQ).
- Force Fields: a Size 3+ model removes one by moving over it. doesn't (FAQ), so an enemy or teleport can't clear your wall.
- (Sentry) is per batch, including Spillover (FAQ). It also covers the Sentry itself.
- is cancelled by a dead Adept squad (tokens leave with a destroyed unit), and Adepts carrying an Artefact can't use at all (FAQ).
- Artefact Hunt carriers drop the marker before resolving any . Don't , (Warp Prism) or (Zeratul) a carrier.
- (Zealot upgrade) only works on a Zealot unit that hasn't activated this phase. ( faction card) reduces to a minimum of 1, so it can't cancel a single point of damage.
#15. Tournament Prep: Building Your List Pair
At events using the recommended Dual List Format:
- You submit up to two rosters from the same faction. Each has its own 2 Mission + 2 Deployment draft cards and its own gas total.
- At the table, both players secretly choose one roster and reveal at the same time (or tell a judge privately).
- Rosters are open, so your opponent knows both of your lists, and you know both of theirs.
- If you submit only one roster, you play it every round.
How to think about the pair
- Cover each other's bad matchups. The classic split is anti-horde vs anti-armour, but tempo vs attrition, melee vs gunline, or objective-spam vs kill-list all work. The test: for every list you're likely to face, at least one of your two should be comfortable.
- Play it as a simultaneous-choice game. You pick without knowing their pick, so build a 2 × 2 matrix (your lists vs theirs) for each likely opponent. Choose the list whose worse result is better (minimax), not the one with the best dream matchup.
- The draft cards differ per list. Each roster brings its own missions and deployments. Pair a gunline list with Hold Position / Frontlines and a fast list with Supply Drop / Gather the Resources, so your choice of list also tilts the mission pool.
- Gas changes Priority. The player who spent less gas wins Priority (colour + draft control). Building one list at ~170 gas gives you a Priority option for games where the draft matters most.
- Share a core. Keep 50-70% of the models common to both lists so your execution doesn't suffer and your hobby time stays sane. Swap the specialists, upgrades and a few units.
- Pick at the table, not before. Tables are set before the round and you see the terrain first. A dense, LoS-blocking table favours your melee or close-range list; open fire lanes favour the gunline.
- Admin: bring both rosters printed, both sets of draft cards, and every model and card for both lists. Make sure Specialist models for both lists are WYSIWYG.
Protoss pair ideas
| Pair | List 1 | List 2 | Notes |
|---|---|---|---|
| Anti-horde / Anti-armour | : Zealots with , Adepts with , Artanis (Sweep), Sentries with (Sentry upgrade) | Robo: two Immortals (or Phase Disruptors), Stalker pairs with Fury, Artanis via (Strike: Damage 3 vs Armoured) | List 1 wins vs Zerglings and Marines; List 2 vs Marauders, Tanks, Roaches |
| Hammer / Anvil | hammer (Sample A); missions Frontlines + Divide and Conquer | anvil (Sample B); missions Hold Position + Artefact Hunt | Hammer vs static gunlines, anvil vs rushes |
| Stealth / Brute | (Sample C): Zeratul, Watchers, (Stalker upgrade / Nerazim Watchers) Stalkers | or brute list | Stealth vs opponents without detection; check their face-up cards for , or |
Note: Praetor Guard and the Pylon are Khalai-only, and Nerazim Watchers and the are Nerazim-only, so the faction card limits how much your two lists can share. Pick a pair with a big common core (Zealots, Adepts, Stalkers, Sentries, Immortals are in every sub-faction).
#16. Tournament-Day Checklist
Before the event
- Rosters are open and due a week before. Count the Marauders, Siege Tanks and Hydralisks in the field; they decide how many Immortals are safe to bring.
- Build your list pair (Section 15) and a 2 × 2 matchup plan for each likely opponent.
- Declare every upgrade on deployment. Specialists must be WYSIWYG (Protoss has none currently).
At the table
- Agree terrain Sizes (especially Size 3+ pieces, the only ones that hide your Stalkers and Immortals), Grass, , passable gaps.
- Track Shield damage separately. Know when each unit's Total Damage passes its Shield value and Shielded-only abilities turn off.
Every round
- Plan PE: (Stalker), (Zealot), (Sentry), (Sentry), (Adept), (Artanis), (Zeratul).
- Decide which Reaction each key unit will want. One per enemy activation.
- Before Scoring: Coherency, 3" + LoS + same elevation to markers. Remember End-of-Round teleports happen after Scoring.
- Artefact Hunt: forces a marker drop. Don't or () a carrier.
Clock & scoring
- 2h30m rounds including a ~15-minute draft. You'll usually have the fewest activations, so bank that time for decisions in Rounds 2-3.
- Result bands (Standard): 10+ VP = Annihilation (5 TP), 7-9 = Decisive (4), 3-6 = Breakthrough (3), 0-2 = Stalemate. Most missions end immediately at a 10+ lead (12+ on Supply Drop).
#17. Common Protoss Mistakes
- Letting cheap Damage-1 dice strip the Immortal's Shield, then eating Marauder/Tank fire with gone.
- Using (Immortal) on a Damage-1 weapon. It does nothing; pick (Immortal upgrade) or ().
- Using to put a Stalker on open ground where it's Size 3 and in LoS of everything.
- Forgetting (Zealot upgrade) needs the Zealots to be not yet Activated this phase.
- Using or () on an Artefact carrier ( forces a drop).
- Charging with Zealots into a unit within 8" of Marauders without a PE plan for (Marauder).
- Recalling units in Round 4 and not having the Supply or activations to bring them back in Round 5. Units in at the end count as destroyed.
- Running out of PE in the round that matters. Every trick costs 1.
En Taro Adun.